(The unit I called a PSP at least 3 years before Sony did)
September 6th, 2001…
It was a dark and stormy night, ok so it was only slightly rainy. But it was evening. I was sitting at my desk working on something. I looked around at items, thinking about how many of them I’d taken apart. Hm, there’s the Atari 800, had that sucker apart about 5 million times… My gaze fell on the Playstation. Never had that thing apart…
5 minutes later I was looking at the guts of a second-revision Playstation. (circa 1999). The motherboard was much smaller than I had thought. There was an additional board that takes the 120 volt wall input and lowers it, hm, seems to lower it to around 8 volts. The CD assembly was quite compact, the whole thing was a lot simply that I would have imagined. I then thought, “I bet those new mini PSOne’s are even simpler”
45 minutes later I had purchased a PSOne and gutted it. Sure enough, it seemed pretty simple. And the best part was, it has an external power adapter, similar to the older game systems. Therefore, the PSOne has a simple 7.5 volt input jack for power.
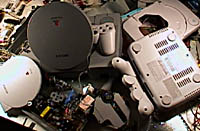 Someday I’ll build a house using junked system cases
7.5 volts, the same as a Sony Info lithium rechargeable camcorder battery, just like my current VCSp’s use. HM…. I grabbed a Casio EV-550 pocket TV I had laying around. I hooked it and the PSOne up to the battery. Sure enough, it ran. But the power consumption was high, about 1.2 amps (with both screen & PSOne). The solution was to remove the bulb from the TV and replace it with 2 white LED’s, similar to my VCSp Gold. Upon doing that, the TV’s power consumption went from 500mA to 250, right clean in half.
September 7th, 2001…
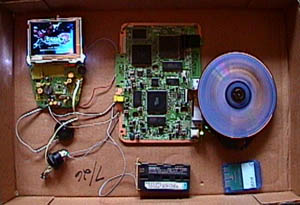
Here is the thing all wired together, running Strider 2. You can see the battery at the bottom of the shot. The spinning disc can be used to hypnotize wild animals and slice tofu.
Initial tests showed this setup consumes an average of 840mA, which is about the same as a VCSp! Despite the spinning disc & motors, the Playstation circuitry, this is going to come as a shock, is much more advanced than an Atari, thereby resulting in better power efficiency. Running non-stop on a fully charged NP-550 battery, the unit will operate for about 1.45 hours, or long enough to perform 3 spells in Final Fantasy VII.
September 9th, 2001
Work feverishly commenced on the case for the PSp, as I had dubbed it. I spent several hours measuring stuff with my trusty dial caliper. One thing I knew for sure, the unit had to have the Dual Shock control sticks. The rumble feature would have to go take a hike, it just sucked way to much power. Also, it had to have a memory card slot and a second player controller port so I could whoop up on people in Street Fight Alpha 3.
OFF-SUBJECT FOR A MINUTE…
Later that weekend, Mike and I were drinking, um, milk and he questioned my practice of trying to ‘portable-lize’ everything. I told him it was fun! He had some suggestions for future projects, here are some of them…
PPp – “Popcorn Popper Portable” A portable popcorn popper… for what purpose I’m not sure. I told him it would take enormous amounts of power. Maybe if there were any drive-in movie theatres left it’d be useful…
CFp- “Ceiling Fan Portable” A portable ceiling fan that you can suction-cup to any surface! Take that breezy, ceiling fan-fresh feeling with you wherever you go! Oh, and maybe you could stick Glade Plug-In’s into it… hm… Actually, the CFp isn’t the worst idea ever…
OK, BACK ON SUBJECT…
I know that last part was pointless, but I wanted to give you an insight into my creative process. Also it was probably the last laugh I had that week…
September 13th, 2001…
After a terrible Tuesday that none will forget, it took me a few days to get back to work on this thing. But I realized that we all must carry on, for if we let the tragedy affect our normal routines, ideals & dreams for too long then terrorism has won. And we can’t let that happen.
On a sub-note regarding the tragedy, when I went to the Classic Gaming Expo, I fully expected the X-Ray guy at the airport to ask what my VCSp’s were in my carry-on bag. I mean, think about it, custom-wired units with bundles of rat-nest connections? They didn’t question them at all, not in Milwaukee leaving or Vegas coming back. Although it can be annoying to be asked, at least it shows they have concern. But they didn’t. Anyway, that’s my story about less-than-stellar security checks, back to the PSp…
Unlike my previous systems, which had 2 halves of a case each an inch thick, the PSOne has a front half an inch thick and a rear half somewhat different…
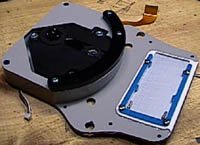
In the smash hit 1989 movie “Back To The Future Part II”, Marty escapes the Cafe 80’s and runs into the park. He then grabs a Hover board from a little girl. Well, if you look close the girl has a CD player on her head. It’s just a knob holding the disc in place and the disc spins freely in the air.
WELL! I thought, if it’s good enough for the Year 2015, it must be good enough for my project. As you can see by the above picture, I skipped all formalities such as ‘drive doors’ and ‘disc covers’. The center motor has those little metal balls that actually hold the disc down and the disc spins freely (it cools your fingers while playing, no, really!). The black edging that looks like a smile keeps your fingers from hitting it.
The CD assembly is one portion of the rear, it screws to the thin back-plate which has the battery connector. The battery holder on this unit is the same as a VCSp Rev 3 and Gold. In the middle of the back-plate you can see some holes, that’s where the shoulder buttons will go. In total 5 pieces have to be screwed together to form the PSp, as opposed to 2 pieces for a VCSp.
Note: The CD assembly from the PSOne had a VERY short data ribbon cable so I had to buy a used 1995 model Playstation from Funcoland and use its ribbon cable. I also had to extend the cable that powers the motors.
September 16th, 2001…
I spent the day routing the cases. I drank 2 Diet Pepsis and ate a candy bar. The operation took about 6 hours, it was not as difficult to rout as the VCSp Gold, probably because the Gold had that rear-mounted cartridge slot that caused me much distress…
September 17th, 2001
It was time to start putting the controls and other objects into the now-finished cases.
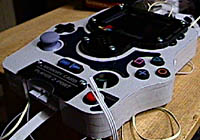
The front of the case is your standard inch-thick Ben Heckendorn special. One difference between it and the VCSp case however, was that the PSp required about 7 different screw post sizes inside, whereas the VCSp has 1. The above photo has a good view of the Memory card / Player 2 port at the base of the unit.
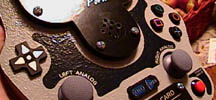
As with the Rev 5 VCSp, the screen portion of the PSp is raised to allow a little more space inside the unit. The buttons were all custom routed by me, except the original analog control knobs and the red “Toggle Analog” button, which was from Radio Shack. The coloring in the middle is actually black metallic vinyl with hundreds of tiny horizontal blue lines, it has a nice effect. It kinda looks like the web site’s background, hm…
September 17th-20th, 2001…
It was time to start wiring things together. On the left is the >somewhat< hacked up PSOne board and the front half of the case, viewed from the rear. At this point, only power, audio & video are hooked up, no connections have been made to the control pads. The right-hand photo has some lines indicating what things are.
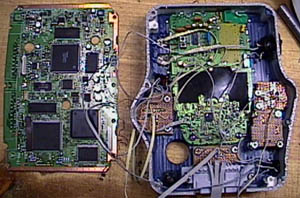
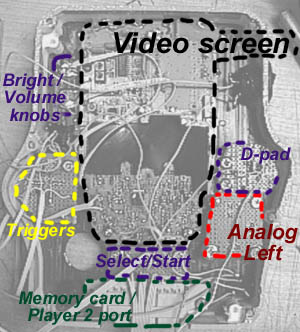
The front half of the case is 1 inch thick, just like all my Atari stuff. But in this case, I wanted to fit the following in the front half of the case:
Video screen, triggers, D-pad, both analog sticks, Select & Start, volume & brightness controls, power ON switch, video out, DC in AND the PSOne board itself.
Now, consider a VCSp Rev 5. The front half of the unit contains the screen and controls. The back half of the unit has the Atari motherboard, power jacks and battery. To be fair, the PSOne board is thinner than an Atari board, but I was still biting off a lot to chew with my goal.
But, through careful positioning I was able to fit all those things in 15/16th’s of space. (Remember, the case is 1 inch thick but 1/16 of that is the front panel) One boon to me was to have the curved ‘flair-outs’ on the sides of the unit. This allowed the joy pad and triggers to ‘get out of the way’ of the other stuff, namely the screen.
One problem that occurred, when screwing the unit together the wires all bunch up, something I don’t always consider in the design phase! But, after a while it all fit together.
September 21st, 2001…
With the unit finished, I applied the final details. Here are some more photos of the unit…
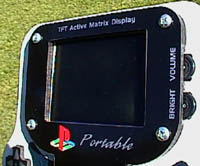
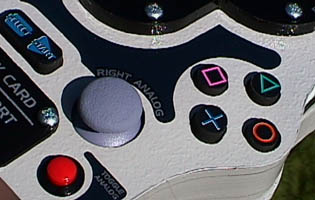
The screen cover is black acrylic plastic, unlike the wooden one on the VCSp. It gives this unit a sleek, modern look. Also here’s a shot of the trigger buttons up close. I didn’t anchor the buttons to keep them from rotating, it seemed unnecessary and I can still recognize a triangle on its side.

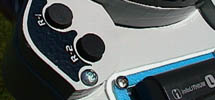
The left hand shot shows the metallic and blue line detailing found throughout the unit. The right hand shot has a shoulder button close up, and the battery. On the side of the unit is the A/V output port (for play on a standard television) and the DC IN jack (to run the unit off wall power)
September 22nd, 2001…
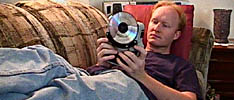
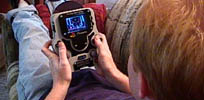
Ah, no better way to spend a Saturday afternoon than relaxing with a game of Symphony of the Night! In the end the project cost about $400 to create, half of that just for the screen! But it was worth it.
Here’s a Video File of the PSp in action.

Hello!
How much does a Portable Playstation 1?