![]()
The case for the unit was actually the hardest part to design. The first month of the project was wiring and figuring out what did what on the Atari board. Up until now I had mostly just torn things off and re-wired them. But the case was the thing I actually had to design.
The case had to contain a circuit board (the original Atari guts), the video screen and its circuit board, the cartridge slot, the batteries, the controls and the power/volume switches. Most
importantly, it had to look COOL!
In order to look 'cool', it had to be as small as possible. Obviously this depended on the size of the main circuit board...

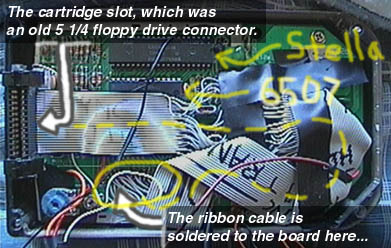
The rear half of the unit.
The unit was done in 2 halves. The rear half contains nothing but the circuit board and the cartridge slot connector.
There might be some electric tape back there, too. Early on I realized that the cartridge would have to stick straight up. It saved room, since it sat on TOP of the circuit board, and not beside it, on the same level (like a Gameboy).
Had I made the cartridge slot like the Gameboy, it would have made the length of the unit about 4 inches longer at the top! Besides, sticking straight up is 1): a sun-screen 2): more like the original Atari. 3): different!
As you can see by the above picture, the circuit board and case was about as small as it was going to get! The blue thing in the lower left corner is one of the potimeters that I used to adjust the video. (see a few pages back). It took about one zillion years to solder the ribbon cable between the circuit board and the new cartridge slot, but it allowed me to put the cartridge slot wherever I wanted.
Now for the Front Half of the case!