How do I re-wire the
cartridge slot?

If you want to build a portable unit then it's quite possible that you'll want to re-position the cartridge slot!
The first thing I would recommend doing is getting a de-soldering iron.
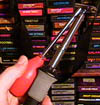
You can get one at Radio Shack for 10 bucks. What it is, is a soldering-iron type thing with a hole in the tip of the nozzle. That hole leads up a pipe which goes to a rubber bulb. What you do is squeeze the bulb to push out the air, and HOLD IT. Then, you put the hot tip of the iron around the pin of a component (usually you do this from the underside of the circuit board) until the solder is melted. Then you release the bulb. It sucks air in, and also sucks up the melted solder! Then you squeeze the bulb again to spit the solder out.
The tips of a de-soldering iron are good for about, say, a week of steady use. Then the hole gets kinda crappy and it doesn't 'seal' around a pin well enough to suck it up. But you can get replacement tips at Radio Shack for 2 bucks a piece.
A de-soldering iron is a very quick way to remove components from a circuit board without damaging them. It's especially useful when removing the cartridge port...
WARNING! This part is kinda tricky, and if you aren't very good at soldering things, or de-soldering things, be very careful!. If you're not sure, have someone else do it. If you don't do it right, you might ruin your Atari.
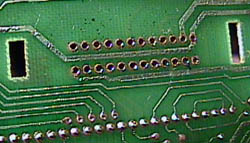
Here's the cartridge port from below (it's the same on all model 2600's). Stick the de-soldering iron on each pin and suck off the solder. Since these pins are long it's easy to heat them up. Find a little cup or something to 'spit' the solder into after you suck it up. (I use the cap from a spray paint can) Little bits of solder rolling around can mess up your unit if one gets stuck someplace!
You should now be able to pull the cartridge connector off the Atari board. Older models might have a plastic thing stuck to the cartridge connector. You can either leave this on or unscrew it from the back. Keep in mind, that those prongs on the sides of the cartridge slot are necessary to push open the cover on some older Atari games, so unless you're willing to build a really custom cartridge slot you might want to leave it. If you're using an Atari 2600 Junior (which I recommend) there will be a small plastic thing still on the board. Squeeze the tabs on the back to remove it.
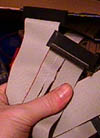
Now, hopefully by this time you've got a good idea of how the cartridge slot is going to be located pursuant to the position of the Atari board. Basically, make sure you know how long you need your ribbon cable to be. As you can see above, your best bet is to get an old floppy drive cable from a computer. I think even my grandma has one of these laying around the house, but, if you don't, you can probably find one in the junk bin of any computer store for a buck.
The cartridge slot on an Atari needs 24 connections. Cut the black connectors off the cable and chuck 'em. Count off 24 wires on your cable, then peel the rest off. (just like string cheese) Now you have the perfect cable! (kinda like the Perfect Storm, or Perfect Dark, or... oh, never mind)
Cut and peel the end of the cable to look like this:
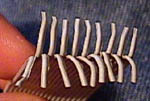
Do the same to the other end. Make sure you bend the same wires the same direction. Go UP DOWN UP DOWN in the same way. You will end up with a cable that has every other wire pointing UP and every other wire pointing DOWN. I recommend having the first wire on the left hand side going UP. In fact, do it that way or else! This helps the wires match the right place on the board AND on the cartridge connector.
You'll have to carefully strip the end of each piece. Don't strip too much because if too much wire is bare it won't solder onto the spots very neatly. 1/16th of an inch will be fine.
Now you get to attach it to the Atari board! This part was no fun at all when I did it on the original VCSp, but I have an easier method now that I will share with you now. I would recommend a 15-watt soldering iron for this (and most things). It's lower powered so it won't melt as much stuff and you can be more accurate with it. It allows for smaller connections. If you use a big soldering iron you might end up soldering 2 things at once! (or your finger)
The Atari board has an upper and lower row of connections. You've got to connect the upper and lower wires of the ribbon cable (now you know why you had to bend them up and down) to each terminal.
First, melt some solder into each terminal hole:
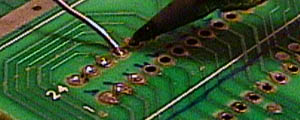
Just touch the solder to the hole and melt it with the iron a little. It'll go right in the hole. This will make it easier to attach the wires!
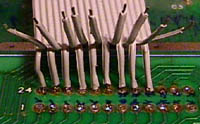
Ok, time to hook up the wires. Attach the row of wires that are pointing UP to the upper section of terminals. This is a pretty easy way to do it. Touch the wire to the terminal, then heat it a bit with the iron. As the solder melts, push the wire into the hole a little. Bingo! Go across for all 12 top terminals.
(Note: In my pictures there are only 18 wires. This is because that's all the ribbon cable I had left when I wrote this section.)
Ok, once you get the top row of 12 wires soldered in, it's time to attach the bottom row.

Bend the ribbon cable over and push the wires down to the corresponding terminal. This might be a little trickier than the top row simply because you have to hold it in place while soldering it. Holding each wire as you solder with a pair of tweezers helps. Again, go across the row and solder all 12 bottom wires in place.
Once you have that done, connect the other end of the ribbon cable to the cartridge port you removed earlier. This part is even less fun. Do it the same way you attached the cable to the board. The cartridge port isn't label with numbers, but by this time you should have a pretty good idea of how to do it. Attach the top row first, then the bottom. It's harder to do because you have to attach the wires to the wire posts sticking out of the cartridge port. Make sure that little strings of wire aren't un-soldered or touching on another or you might get a short circuit. (starring Ally Sheedy) Basically all you're doing is extending the cartridge slot connections. Just take it slow and you should be OK.
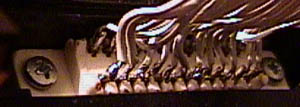
Ok, if you've survived this far, go ahead and test the thing. Remember some cartridges won't open if you removed those tab things from around the cartridge port. If the Atari doesn't work, make sure that you went UP DOWN UP DOWN with the connections and didn't skip any. Follow the connections by eye and make sure they look right.
Congratulations! You've re-wired the cartridge slot! You can put it wherever you want! YAHOO!
