All posts by benheck

Goodbye, Nintendo! It’s been fun… (A Rambling Mini-Essay By Ben)

I HAD to write about this. Someone sent me a link to IGN that reports that Sony just announced a Portable Playstation. All I can say is, IT’S ABOUT TIME!

They did exactly what they should. A 1.8 gig 3″ diameter disc, much like a Gamecube. They can fit an entire PSOne game on a disc, even a 2-disc game. Awesome. They can repackage PS1 games for an instant library of titles, then make new ones. All on familiar technology – I bet the PSp will have the same, or near same, dev kit as the PSOne. A backlit screen! Right off the bat – no waiting a year to make you buy the unit twice (yes I did just type that) Interacts with other things, such as cell phones. USB2 support. The list goes on…

And the end result?

I love Nintendo. I played my NES to death. I was still playing Perfect Dark on the N64 when Timesplitters came out. I wanted the Gamecube to succeed because I thought it was cool. Having said all that, I do believe this is the death toll for the Big N. At least for them being a hardware company.

Slowly they are being beaten on all fronts. The Genesis gave them a run for their money. Then the Playstation outsold them. They had big hits like Goldeneye, then Rare left them. Now they’re squeaking by on units, a mere fraction of what Sony sells. Their big games are lucky to sell a million copies these days.

They are becoming the next Atari.

Resting too much on their laurels, the Gameboy is to Nintendo what the Atari 800/2600 was to Atari. (I consider the Gamecube a non-factor) Atari tweaked the 800 computer to build the 5200 game system. The 7800 had the same processor as the 800 computer, the same sound processor as the 2600 (2 stinking channels!?) and its fabled “Maria” chip is just a slightly upgraded ANTIC chip, also found on the 800. (I may be a little off in my tech but it’s close enough to make a point). Then, in 1987, Atari tweaked the 800 again to build the XE Game System.

Old tech, new box. Older tech, newer box. Is that so much different than the Gameboy? A Gameboy Advance is no more “advanced” than maybe a 1991-era game system. Ok, it’s got as faster processor but where’s the polygon support? By not ‘advancing’ the Gameboy Advance enough because they didn’t need to (since they had, as the Afterburner guys put it, a “portable monopoly”) they have retro-actively shot themselves in the foot.

“Those who do not learn from history are doomed to repeat it” the saying goes. Stay tuned for my equally lopsided Gameboy Advance SP vs VCSp SE review!

VCSp Revision 6 Prototype Built

I’m sure many of you thought I didn’t have the ability to count to 6 (much like how Capcom had trouble counting to 3) but, here it is, VCSp Revision 6 Prototype!

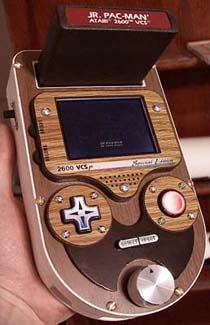
A VCSp Rev 6 looks REMARKABLY like a Special Edition, except the main body of the unit is made from plastic (note the white sides, unpainted on this prototype). The main advantage of this unit is that, because of the material change and others internally, both sides of a unit can be routed in about 5 minutes, as opposed to 1.5 hours with all previous models.

For more juicy details on what makes this unit faster to create, visit the Rev 6 entry in the Models section of my site.

The biggest advantage of this design is that I am planning to build as many as 40 of these style units. If you are interesting in being on my “pre-sale” list, feel free to email me for details. I also plan to contact people from my previous pre-sale list and inform them of this development.

Naturally, this prototype itself is for sale and (obviously) ready to go!  If interested, let me know.

ALSO! If anyone out there is familiar with how to implement a Sony Info lithium battery charger into a device, I’d be very interested in your help. A self-charging VCSp would be, much like Cold Fusion, a great benefit to mankind and a feature I’d love to incorporate into the mass construction.

Lastly, the rip-roaring battle royale fight-to-the-finish GBA SP vs VCSp SE article (see below) will be done shortly, so don’t despair!

Coming Soon: The Gameboy Advance SP -VS- The VCSp SE!

Start placing your bets now! In the near future you’ll GET READY TO RUMBLE! Not even two years ago, the VCSp Rev 5 butted heads with a spitfire newcomer, the Gameboy Advance! Now, in the brave year 2003, Nintendo has launched its latest entry in the war for portable gaming dominance, the Gameboy Advance SP! (Spend Profusely)

Which unit will prevail in this knock-down brawl to the end? STAY TUNED!

Obligatory Update Due To The Fact That This Site Was in Wired Magazine

Nothing like superfluous capitalization of words, I always say! So, welcome any and all newcomers to the site and to the hobby of “Portabilization”, which I inadvertently invented a couple years ago.

To your left, you’ll see a menu system thing. The various models of portable units I have built are displayed under -get this- MODELS! Amongst the other menus you’ll find info on hacking up your own Atari system, video clips of things in action and more!

So feel free to cruise the site and indulge yourself with my ramblings!

In current news, the unit mentioned below has been sold. Also, I am near to finishing my movie, which as you all know, has cut into my portable-building time for over a year now.

PS One Screen Slashed to Bits!

Grand Theft Portabilization

Ah, a personal holy grail of mine. I bought a PS One screen a while ago because, well, let’s face it, $130 for a 5-inch TFT screen? You can’t beat that!

BUT (there’s always a butt) the darn thing consumes around 1 amp (not milliamp, AMP) of power at 7.2 volts. You hook this thing onto a PSOne and it uses as much or MORE power than the game system itself.

So, where to turn… Where indeed! White LED’s! Of course, the PSOne screen has this really odd bulb thing going around the backlight plastic. It’s U-shaped and covers 3 sides of the plastic. Well, I ditched that thing and stuck in 3 LED’s, each pointing down a side, much like marching soldiers or that scene in Tron.

If any of you other tinkerers would like to give this a go, just wire (3) 3mm white LED’s in parallel off the PS One’s +7.2v power source and put a 22 ohm resistor in front of them.

The end result? A screen that now consumes only 350mA when running, a mere 35% of the original power sucking. GEE! What could I have in mind for this screen? Only time will tell!

VCSp Revision 5 Files Released!

Here it is, portable-lovers! In all sorts of vector file formats, the files that can be used to build a VCSp Rev 5!

Visit the Downloads page to get the WinZip file containing the goods. The WinZip archive contains:

  • Separate files for the screen riser, buttons, battery cover, front half and rear half of the case. Each file indicates what thickness material to rout it out of, and also the depths of features on the piece.
  • The front & rear halves are accompanied by a bitmap file for each called Front Rout and Rear Rout, respectively. These were files I’d always have on my PDA so as I routed cases, I knew at what depth to rout out each part on the case.
  • Read Me file describing the terms under which you may use these files.

 – HINTS & TIPS! - 

Not all of the blanks are filled in, however, for a couple reasons. One, I’m lazy. Two, if you decide to use the files and create something, you can improvise things (such as the tricky battery cover slot routing) and make changes on your own.

Front Half of Case…

You’ll notice 4 screw risers on each side of the unit. These will (more or less) perfectly fit a Radio Shack general-purpose IC PC board (catalog #276-150a) for which to place your buttons/switches/components on. How you place your video mod circuits, heat sinks and the like on this board I leave to you.

You’ll need an RCA L2501 pocket television for the screen. They are still available at Best Buy as of this writing, you can also find them used online if you do a search. The neat thing about the L2501 is the long ribbon cable connecting the main board to the screen. You can remove the screen, stick it through the hole in the front of the case, cram it into the screen riser piece, then drill holes on the 3 screen riser posts that match the holes on the screen’s PCB! (ah ha!) To save time and money, use the 3 screws that held the screen in the pocket TV. The ribbon cable can be bent at a 45 degree angle, and you can affix the main PCB of the pocket tv in sideways.

Be careful of the wires that connect to the bulb on this TV, they can be easily broken. (If you convert to white LED’s you’ll remove them anyway) Of course, you’ll have to de-solder the brightness and volume controls and connect them to the side of the unit…

Rear Half of Case…

Hm, see those mysterious holes on the left side of the unit? That’s my initials (BJH) in Braille, and also vent holes for the heat sink (a clue as to which side to put it on!) You’ll see the two screw posts where you can attach the chopped up Atari 2600 board (see below). The battery goes on the right hand side. You’ll need to affix a match plate over the battery compartment to keep it in place. For the battery contacts, I suggest drilling holes in a piece of that Radio Shack IC PC board and shoving some male molded nylon connector prongs through. (search Radio Shack for this) Those will precisely fit the holes on a Sony Info lithium battery.

So, good luck! If you have a specific question, such as “what type of heat sink?”, feel free to email and ask away, however, to pre-answer 50% of the email I get, I will not be providing a complete ‘how-to’ as I currently do not have enough time to write one up. Try the forums, (see link to left), there’s plenty of people working on portables who can also offer advice and solutions to issues regarding this hobby.

And finally, if you build something using these files, please, let me know! I’d love to see your finished products!