

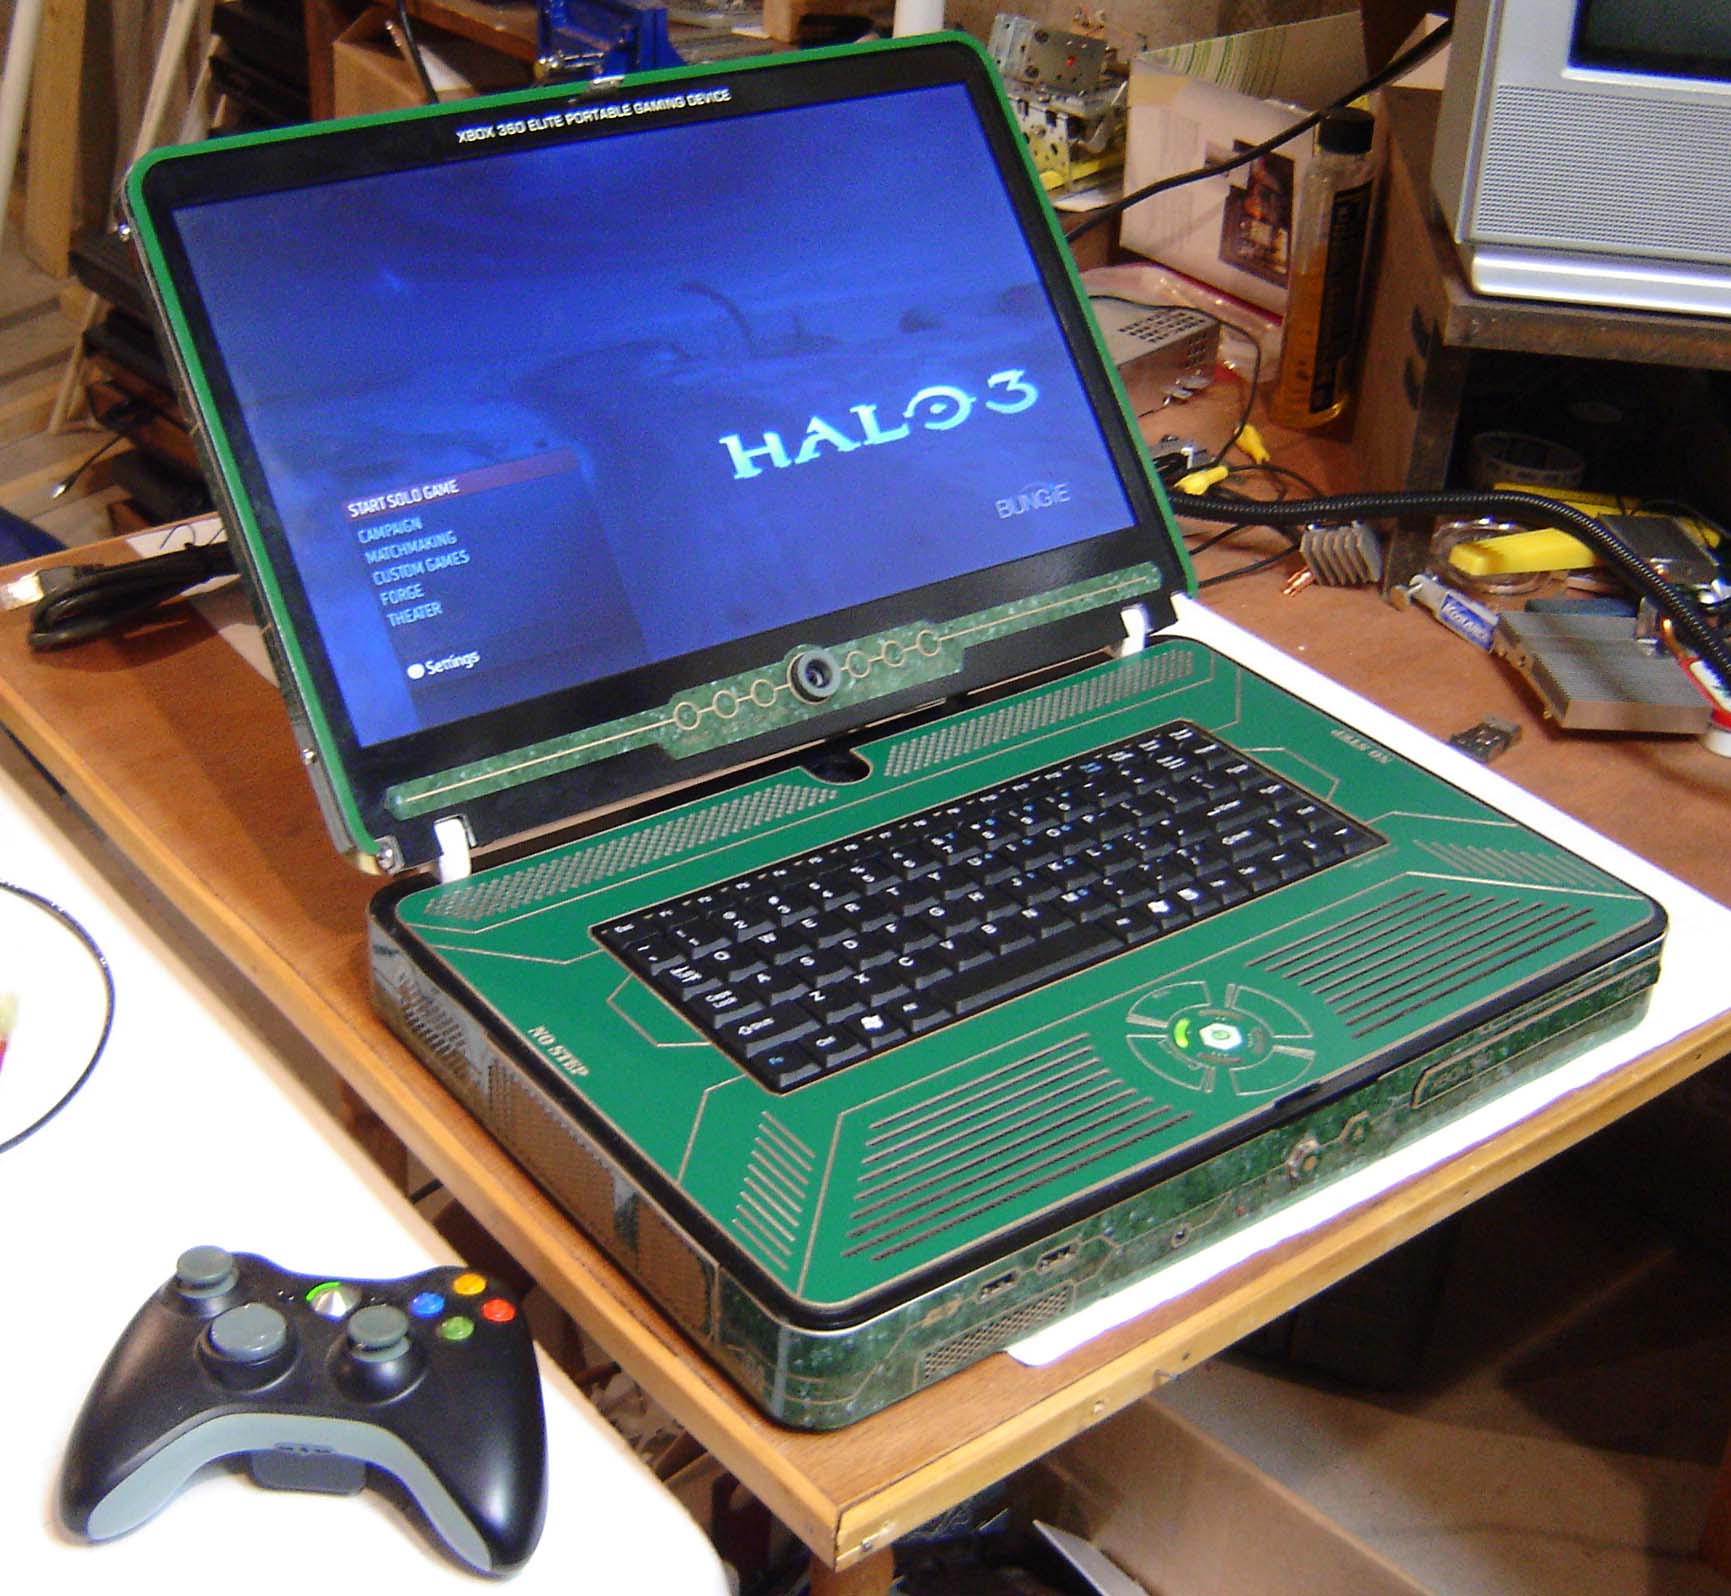
Xbox 360 Elite-based laptop. Click here for a larger version.
Well after a long process my new Halo 3-inspired Xbox 360 laptop is complete. It has some new features compared to past units:
- 120 gig Elite hard drive.
- HDMI-to-DVI video connection for digitial picture on the LCD (versus VGA on past mods)
- Uses an Xbox with the new 65nm processor die.

In a departure from my usual design asthetic, this one has a lot of surface detail. Click here for a larger version.
Click here to view the Demonstration Video, large and small.
This unit, like all of them, was done by request and thus already spoken for. I do not plan to build any new Xbox 360 laptops in the near future, since they tend to be quite time consuming and I’d like a bit more variety in my life. That said, for the making-of story click below. Enjoy!
Note: Though I am tired of Xbox 360 laptops I am always up for other design consultation or custom jobs – email me.
(All shameless advertising links open in a new tab/window for your shopping pleasure)Â
It all started last summer when I was encouraged to build yet another Xbox 360 laptop. Often I feel like Rambo – you know, off at a monastery, retired, but always called back for “one more mission”. Anyway, I thought it would be fun to do a color scheme/design inspired by Halo 3, so I decided to build yet another.

For this unit I decided to “skin” the sides with some thin engraving plastic material. This would give an overall shiny appearance and allow much finer detail on the sides of the unit, specifically all the hexagon-shaped air holes. I also had to work in an Xbox Live Vision camera, which the customer requested.


You must have a camera so people in Uno will know who bested them.
The first piece I made was the lid for the screen area. Most of the LCD screen was only 1/2″ thick but the circuit driver board on the back of it required some extra depth. Rather than make the entire lid the maximum depth I made most of it only as deep as the LCD, then made a raised hollow portion in the middle for the circuit board to rest inside. This gives the illusion of making the unit thinner, which is never a bad thing.

For the internal layout I switched things up a bit from the last 2 laptops. The DVD drive is now on the right and the motherboard is rotated 90 degrees. I built the case in the usual way, plastic for the walls, aluminum for the main thick plates.


When you’re making a slim case fans are a big issue (and they smaller they are the more expensive they become). On the left side of the unit there is no motherboard, so I could use larger, better, cheaper 35mm fans. These are 12 volt units that I tied directly to the Xbox’s original fan connection, thus allowing the system to control them. (Something that apparently happens but I’ve never really witnesses) The rest of the fans are 5 volt, we’ll get to those in a moment.

This particular Xbox 360 laptop underwent several internal revisions along the way. The heatsinks changed, things were swapped around, it was quite an ordeal. Pictured above is an early revision, mostly to show the keyboard. Once again I grabbed a small keyboard off Tiger Direct, hacked it up, and worked it into the case, along with its USB hub. A small connector is added so the keyboard can be attached/detached from the base of the unit easily. Considering how much f’ing around and troubleshooting goes into one of these, it’s best to make it as easy to disassemble as possible.

Unlike the last few laptops I completely rewired the power connector, so that it includes both the LCD and Xbox power signals in one plug. If it looks similar to an ATX power connector, well, that’s because it is! I bought the receptacle from Digi-Key, and the wire harness itself came from an old, often-cannibalized friend…

Some of you may recall the MGD computer from back in early 2004. It was originally built to record audio for the looping of Port Washington since at the time I didn’t have a laptop. Since then it has fallen victim to various scavenging raids – the power switch ended up in the Commodore 64 laptop, all of the cabling has been ripped out and it basically will never run again. Sad, yes but it is a far, far better thing it does than it has ever done before.

Back to the project at hand! The next step was to see if a hand-wired HDMI-to-DVI connection would work. Couple reasons for doing this – there wasn’t enough room, specifically depth, in the lid portion of the case for a DVI plu. Second the shortest HDMI-DVI conversion cable (from Tiger Direct) is 3 feet long, whereas for this we only need about 8 inches. Feeling surely (and with a spare conversion cable to double-check pinouts) I snipped the DVI plug off the end and went to town.

Success! The monitor I used – a 17″ widescreen Gateway – is exactly 1280×720, rather than the 1280×768 you often see in monitors of this size. This allows a pixel-perfect ratio when using the 720p HDMI connection. Since a lot of 360 games run at 720p natively (even if they upscale later) this is a sufficient resolution, especially since LCD’s don’t get into full 1920×1080 until at least the 22″ range.
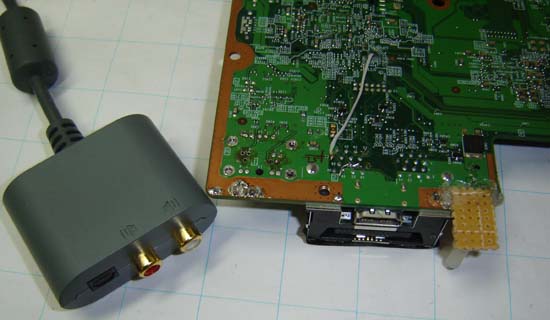
At the A/V port, connect pins 20 and 24 both to ground to enable analog audio with HDMI video.
Let’s move onto sound. It is provided over HDMI (one of the only real differences between HDMI and DVI, as far as I can see) but this monitor doesn’t do sound. You can see where a sound amp could go on the board, but they didn’t include one – nuts. Anyway, this meant I needed to use the little analog/TOSlink dongle they include with some Xboxes. If you’ve read some of my previous articles on Engadget you’ll know there’s a few pins on the A/V port that tells the Xbox which mode to use, such as VGA, composite, SCART etc. It turns out that the dongle adds a new code, telling the system that the video is HDMI but the audio is coming from the old port as normal. If you do not set this pinout audio will not appear at the analog source pins.

Above is a photo showing everything in the base of the unit. This was just before I swapped out the Xbox motherboard for a new “Falcon” 65nm model, but it basically looked the same. For the audio amp I bought a cheap pair of computer speakers from Tiger Direct (originally to be used on the PS3 laptop but this unit came together first) and modded its circuitry to fit in the case. The speaker amp pulls power from the main 12 volt line so they turn on with the Xbox.
For an even snarkiner power-piggyback I grabbed 5 volts for the smaller heatsink fans from the 5 volt TOSlink line on the A/V cable. There are a lot more 5 volt sources available, mainly the USB, but these stay powered even if the system is off so I needed a 5 volt source that only turned on with the main system.
Fun fact – from units I have seen the PS3’s USB power turns off when the main system does, thus preventing you from charging controller when everything is off. The Xbox 360 and if I recall correctly the Wii both keep their USB powered even when off – thus making them better solutions for charging PS3 controllers when not in use. Amazing. Things like that non-withstanding, the PS3 is still the best-built system, but I digress.

Above is a view inside the unit with the lid being closed. It’s a tight fit but that’s the way things go in the mean streets of Verona.


The action of Halo 3 moves so fast my camera clearly couldn’t keep up.

Shown above is the new 65nm CPU in the Falcon unit. The main IC itself is smaller than it used to be and thus smaller than the unchanged GPU die. The heat spreader area (heat spreader being about the lamest-sounding term on Earth) is also smaller and now rectangle shaped instead of square. As mentioned in my earlier post this CPU runs a lot cooler than the old one and even within this unit about 20 degrees cooler, on average, than the GPU.
What follows are some general photos and notes about this unit:

Here I am, taking a photo of a photo of myself, in an exercise of supreme redundancy. I have rewired a lot of crap in my day but the Xbox Live Vision camera is one of the most persnickety things I have come across. In order to work properly it had to have a shielded connection literally from the USB area on the motherboard all the way to the camera. Not even the SATA cable or DVI was that picky. At first I thought I had ruined the camera so I bought another one, for no reason. Oh well, maybe I’ll work it into my next project…

Click here for a larger view.

Click here for a larger view.

Close-up of the USB ports. I didn’t want to specifically “rip off” Halo 3 graphics for obvious reasons but I used a lot of the same concepts. Specifically there’s lots of lines connecting things, the colors orange and green (like the interception-mad Packers) 45/90 degree angles and the ever-present hexagon. Every vent hole on this unit is a small hexagon, which took longer to draw up than I care to admit.

An Xbox case sitting on the laptop for scale purposes.

Another view with the unit running. Sorry the flash kind of washes out the LCD.

The power supply even has trendy styling to match the case.

Left side exhaust ports.

Volume slider on the right side of the unit.


An Xbox case sitting behind the laptop for depth reference purposes. You can also see the lid latch open button, disc eject, IR sensor and the small controller sync button. My usual goal with projects like this is to make the finished product no thicker than the original console, even though an LCD and screen lid has been added. The PS3 laptop will follow this tradition, mostly because the PS3 is pretty damn thick to begin with and there’s nowhere to go but thinner 😉
I hope you have enjoyed my latest “Making Of” article. Sorry if I didn’t include more of the usual BS, been pressed for time. More projects are coming, so the long Benheck drought is finally over!
16 thoughts on “Xbox 360 Laptop 3 – Elite”