
VCSp Revision 1 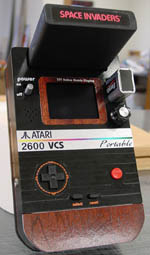
Constructed from February-April of 2000. Uses a 9 volt battery to power the Atari circuits. 9 volts last about an hour. 3 AA’s power the TV portion. 3 AA’s last around 3 hours. TV screen is a Casio EV-550. Routed in a solid block of inch-thick Acrylic. Painted black with industrial-grade enamel. Brushed aluminum banding across front, real wood grain detailing throughout. Size: 4.5 x 7.5 x 2 inches. Approximate weight: 3 lbs (without batteries)
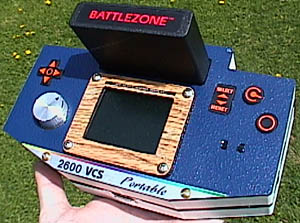
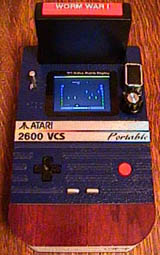 VCSp Revision 2
Constructed from January 13th-January 28th 2001. A second-generation VCSp with internal changes to speed up construction time. Uses a 9 volt battery to power the Atari circuits. 9 volts last about an hour. 3 AA’s power the TV portion. 3 AA’s last around 3 hours. Battery time is the same as the original. TV screen is a Casio EV-550. Routed in inch-thick Densitec, a type of plastic. Sample Densitec that I used was blue, has white coloring on sides, and blue on the rear. Black trim around screen, and a wood grain battery cover. Approximate weight: 2 lbs (without batteries). Size: 4.5 x 7.5 x 2 inches
Added features:
- Second-player joystick port. Added as an afterthought, but a good idea nonetheless! Something I’ve wanted to do all along, just now did.
- A/V output jack. A REALLY neat feature, also something I’ve had in mind since the beginning. I didn’t realize how cool it would be until I did it…
Note: I actually prefer playing this unit over the original, (!?!) because of the added features, it’s less heavy and the textured plastic feels nicer than just smooth plastic. And the color has really grown on me.
VCSp Revision 3 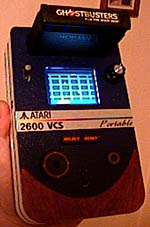
Built in less than 5 hours over the course of March 4th-7th. The fastest construction so far, BY FAR. I spent over a month designing this new style, and although it doesn’t look much different, there are a lot of changes inside that simplify construction immensely.
Many changes! The Atari board has been hacked up in a different way. The cartridge plugs directly into the original cartridge slot, to save me time and to make it a lot more durable. New Salvador Dali-esque curved wood grain. New switch contacts, all control buttons are tactile pushbutton switches for faster response and longer life (than gutted NES controllers). Disc-shaped control pad (but trust me, it works a LOT better than the Intellivision) By the way, the Intellivision is my least favorite classic system. MINE ISN’T EVEN HOOKED UP!
Runs off a rechargeable Sony Info Lithium battery. Battery slot is open so you can insert larger batteries for longer play time. (The cheapest battery, the NP-330, lasts about an hour) The rechargeable battery slot is also easier to build than hookups for 3 AA’s and a 9 volt. (the 9 volt hole that everyone loves caused me a LOT of trouble)
The second-player input jack was dropped on this version. It added extra time and drilling, and for a feature I’m not sure is necessary. Perhaps when I get settled into these it shall return. However, the A/V output jack is still in this one, and will be in all future units no matter what. (come heck or high water)
 VCSp Revision 3.1
Same as Revision 3, but uses a different model screen. A screen that costs $50 less, in fact. However, it is PASSIVE, not ACTIVE matrix. (“MY NAME IS NEO!”). The difference is similar to the difference between an old-style Gameboy and a Gameboy Color.
Another drawback is incompatibility with some games. It’s probably due to the way the Atari produced the screen display. It was done based off sync and individual scan-lines, since the 2600 had no screen memory. That sort of tom-foolery might trick the circuits of the cheaper Radio Shack TV in the VCSp Rev 3.1…
Click here for a list of incompatible games. I can only check what I have in my collection, but it’s a good sampling of most common games.
I am getting pretty close to a production run model that I am happy with. I want to build one more Rev 3.1 before I commit to taking orders, but rest assured I am getting there. About the only change I might make on the next one is adjustable screen tint / brightness. The unit has internally mounted potentiometers which I preset to an ‘average’ level. If I placed them differently and had an opening (probably just to the right of the RESET button) a person could adjust them with a small screwdriver if they wanted.
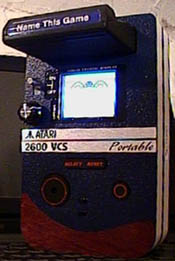
VCSp Revision 4 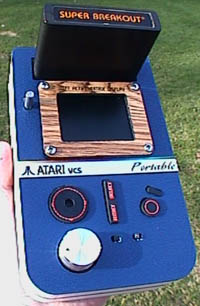
Shaped like a Rev 3, but has a paddle controller built in! Also has a second trigger for the paddle control. Different type screen again, this time it’s an RCA L2501. Twice the resolution as the VCSp Revisions 1-3, same size screen. It’s TFT Active Matrix big time, no more of that passive matrix crap for me! Controls are a little weird, it was a bit hard ‘retrofitting’ all the new stuff into the same old case. This unit was designed and built in 1 week after a helpful email suggesting using the RCA screen.
 VCSp Revision 5
A complete re-design from the ground up. Controls are now side-mounted. The screen is the same as the Rev 4, so I guess it’s not a COMPLETE redesign. Close enough! Second-player joystick port (visible on base of unit), A/V out, second player paddle compatible, DC input, separate large button for paddle and new style select/reset switch are all new changes. The battery drops through the top of the unit (just above the trigger), it does not ‘clamp on’ to the bottom as it did on Rev’s 3 & 4. Also the volume and brightness knobs are discreetly located on the right hand side of the unit.
A note. This unit no longer has an Atari logo on it. Since this unit will probably be made in larger quantities than the ones before, I removed it for copyright purposes. However, by this time everyone knows what it is anyways! If not, tell your friends!
VCSp Gold 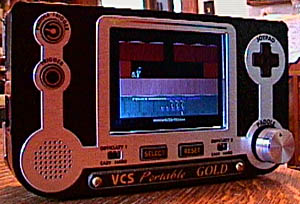
Built from July 5th – August 9th 2001. Like the Rev 5, this is a completely different design. It uses a 4 inch screen, quite an improvement over the standard 2.5 I’ve been using. Other features included real brushed aluminum face plate, real gold leaf buttons & labels and larger, front-mounted speaker. Also (not shown) you can screw a small joystick into the control pad, much like a Gravis Grip PC controller.
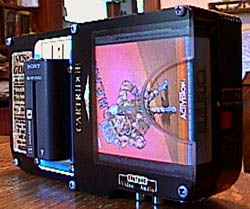 VCSp Gold from rear
Another big change is the cartridge slot, which is now in the rear and allows games to be inserted flush with the unit. A clear acrylic cover protects the cartridge. You can also see the battery clipped on in this picture. Unlike the Rev 5, you can stick on a larger battery for more power. Also, please note the full-size RCA jacks at the bottom used for A/V output to a television.
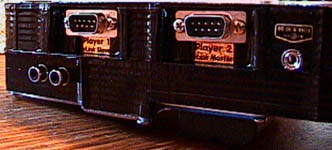
Here are the joystick ports (and again you can see the A/V output jacks on the left). This is the first (but not last) model VCSp to have 2 joystick ports, and why, you ask? To link units together, of course! Each ‘linkable’ unit has a master and a slave jack. The ‘master’ unit has the game cartridge, such as Combat. Using a standard 9 pin cable, you connect the master port on the master unit to the slave port on the slave unit. The slave unit does not need a cartridge. Turn both units on and presto! 2 player action and each person has their own screen, the video is sent over the cable.
You can also use the extra joystick port for (shock!) a joystick to replace the built-in control pad for one-player games.
However, one of the best things about the VCSp Gold is the new power management. A 4 inch screens draws significantly more power than a 2.5 inch screen, so something had to be done, otherwise the VCSp Gold would have to run off car batteries or personal generators.
The first step was to use a switching regulator for the Atari circuitry. Normally I use common 7805 linear regulators on the Rev 5 models. Using a switching regulator I was able to save 100mA of power. Also, a switching regulator does not require a heat sink since it doesn’t make much heat. It does cost more, however.
As for the screen, I removed the mini fluorescent bulb that it used and stuck a white LED on each end instead. Why?
The screen used in the VCSp Gold (the Casio EV-4500) draws 700mA of power. That alone is almost as much as a Rev 5 takes, let alone the Atari circuitry. I did an experiment where I disconnected the bulb & transformer from the TV. The TV then ran at around 200mA.
But it still needed to be backlit, of course, otherwise I couldn’t write pretentious articles like VCSp vs. GBA. 2 white LED’s only take 80mA of power, so I used them instead. The result is a screen that uses 280mA of power instead of 700.
A standard Sony Info lithium NP-550 battery will power a VCSp Revision 5 for about 2 hours. That same battery will run the VCSp Gold for 3 hours, and with a bigger screen! Math does matter!
In the end, the VCSp Gold runs at about 542mA, whereas a standard Rev 3 uses 800mA! Hopefully in the future VCSp’s can be even more power conserving…
So, there it is! The VCSp Gold! Now I can get onto other matters, such as the Phoenix…
‘Til next time!
VCSp Revision 6 – May 7th, 2003
Same design as a VCSp Special Edition because, darn it, I love that design and so do a lot of other people (from what I hear). Here’s the kicker:
Before, with pretty much ALL of my previous units, I would have the routing machine carve out the hollow parts of a case and leave a little (typically .063″) material for the back or front. Now, that takes time because the router cannot dig the full depth at once or the bit would break. It must do “passes”, typically .25″ deep at a time for the entire inside of the case, left and right, up and down, much like the electron beam inside a TV (as I describe a complex idea with an even complexer one, and make up the word ‘complexer’ as I do) . The Oak units took even longer, because the machine had to be run at about 1/3 normal speed to cut wood without breakage. This photo from the SNESp section is probably the best illustration of this process that I have on file:
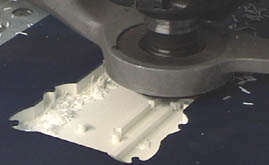
See the layers? Carving out cases was a time consuming chore, typically taking 20 minutes per half. With material/bit loading and everything else, I’d usually be looking at 1.5 hours just to rout the case for one unit, not to mention the buttons, screen overlays and what not. Now, take a look at these routed parts for the VCSp Rev 6…
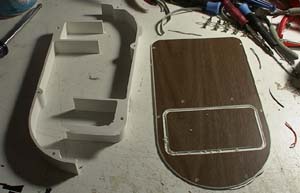
First off, this is a material called Sintra which is very much like PVC piping. Except it looks nothing like a pipe and comes in .75″ thick sheets. The router can slice through this stuff twice as fast as oak, and with a deeper depth-per-pass. Meaning, you can gouge out .375″ deep at a time instead of .25″ Two passes and you’re done!
I had thought about using this stuff quite a while ago, but at the time I didn’t have a unit designed to fit in .75″ halves. Everything was 1″ halves. Until I built the Special Edition, which was designed to fit within .75″ oak boards. Therefore, I could make a Special Edition style unit out of this Sintra stuff as well.
But that alone would only decrease routing time to about 20 minutes per unit. Therefore, I looked at what on a unit requires depth and form – the walls. So I decided “why not just rout the WALLS and then make a separate face / back plates to connect the walls?” (Those of you who are familiar with CNC and have been following my site are probably now paying out or collecting on your bets regarding how long I took to figure this out. Oh well.)
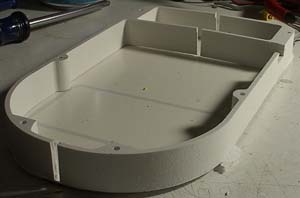
Not only can the machine cut out the walls quickly, but you can nestle them in the raw material, as the left photo sort of depicts. The same area of raw material it took to cut 1/2 of the case can now fit both halves.
When I had the files set up and did my prototype test of making cases in this style, I routed enough walls for 2 units in 10 minutes. An improvement, wouldn’t you agree? Then, using a different type of material that is .063″ in thickness, I routed the front and back plates. These plates are then screwed onto the walls (photo on right) creating cases that work just like the old style cases did (though I prefer MGD to Old Style)
A concession of this method is that now you have hold-down screws on the front of the unit as well. I used brass screws for this to lesson their visual impact. Also whilst building this prototype I ran out of the light brown wood grain plastic (the kind that goes around the screen & buttons) and had to use this darker color wood grain stuff for the front plate, as you can see. This ‘two tone’ look is actually staring to grow on me. Also, the Sintra only comes in white. It could be painted black, or covered with wood veneer, although again either of those would add time to the process.
The main purpose of the Rev 6 design change is to allow units to be built a little faster so I can make a decent quantity of them to meet the demand. The input of my readers is always appreciated if you’d like to comment on colors and stuff.
So, here’s hoping I can build more of these units!
One thought on “VCSp Models 1-5 Timeline”