

Long, long ago (fall 2000) I was working on a portable Atari to be the successor to the original VCSp. It was to be called the Vagabond. I destroyed quite a few Atari 2600 Juniors in my quest to cut a unit down to smaller and smaller portions, but along the way I learned a good deal about Ataris and the electronics to make them portable.
After 4 or 5 months of tinkering with the Vagabond, I decided it might be better to work on Ataris that could be built easily enough to sell to all the interested buyers out there. At that time, I built the second VCSp, the Rev 2. Since then, many revisions have followed.
The original Vagabond was meant to meet the following specifications:
- Run off a rechargeable Infolithium battery
- Have a 3″ screen
- Have a slide-down cartridge slot in the rear of the unit (like the Gameboy)
- Be much smaller than a standard VCSp
- Have a built-in paddle controller with a side-mounted button.
Long time readers of this site and those familiar with my work will probably notice that most of those specs have been built into various VCSp revisions since then. In fact, the VCSp Special Edition / Rev 6 is pretty much exactly what I envisioned the original Vagabond to be, right down to the center-mounted paddle controller. Still, I wanted to make a unit with a few more of the Vagabond’s original concepts, so earlier this year I set about to doing just that.
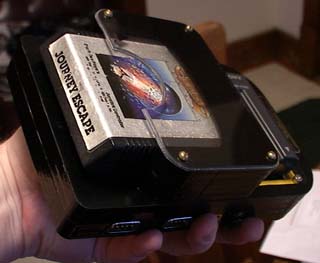
First issue was the cartridge sliding down the back of the unit. So I used the guts from a plain vanilla 2600 to build horizontal mount cartridge Atari board.
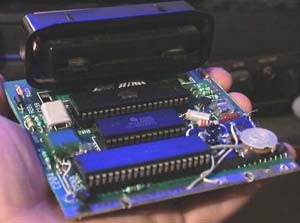
This is your standard-issue Atari 2600 4-switch chopped down to the standard issue 4×4″ square. The cartridge slot has been remounted 90 degrees forward, and the level at which the cartridge inserts is .063″ above the chips. Some items, such as the crystal and a few capacitors had to be resoldered flat as well.
The cartridge itself is about .75″ thick, so along with the plastic cartridge slot thing it adds about 1″ of depth to a unit if the cartridge slides in. Because of that, I decided it would be best for the rest of the unit to be as thin as possible. Most all of these units have a front half and a rear half. I started with units that had 1″ halves (Revs 1-5, the Gold) then went to .75″ halves (the Rev 6). To offset the cartridges size, I ventured to try .5″ halves. Here’s how I did it…
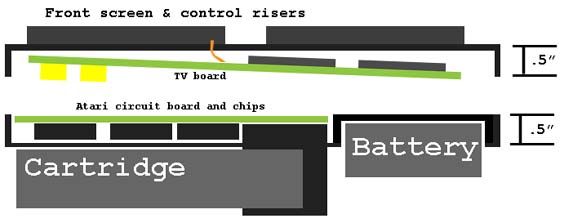
This drawing shows the side view and depth reference of the Vagabond ’03. The Atari board is in the rear section of the unit, facing outward. It, and most of the battery, fit within the .5″ depth of the rear half. The cartridge holder fits within the raised portion on the back of the unit, the thickest part. The battery clips onto the back of the unit as with the Rev 6, however it is not flush as before. This does not pose too much of an ‘ergonomic’ issue as you can grip near the cartridge slot.
The front half of the unit only needs to hold the TV’s circuit board. Luckily (said with all sarcasm) the TV’s board has components on its front and rear sides. This requires it to be set at an angle inside the unit, as shown. The TV glass and the control buttons lie within the risers, freeing up space within the unit.
As with the SNESp, the unit would be quite thin were it not for the big, thick cartridge!
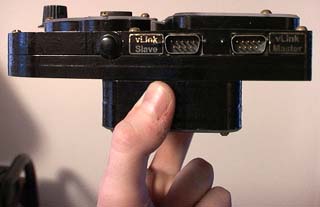
You’ll notice how this unit has 2 joystick ports, labeled “Slave” and “Master”. This is used for the vLink ability of some VCSp’s. This Vagabond unit, the VCSp Gold and a few other units have the ability to link to one another for head-to-head combat. (It’s not a standard feature, usually it’s only put in by request) Only one cartridge is needed, and video is sent to both units. Connection is made by a joystick extension cable with female connectors on both ends. It’s a fairly simple setup, basically one VCSp becomes a controller with a screen. But we have to show up those Gameboys, don’t we?
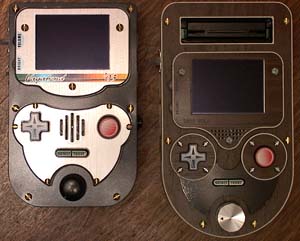
Here is how the Vagabond ’03 compares with a standard VCSp Rev 6, size-wise. The Vagabond is the same width, but is an inch shorter in height. The screen in the Vagabond takes more of a center stage, not getting overshadowed (literally) by the cartridge.
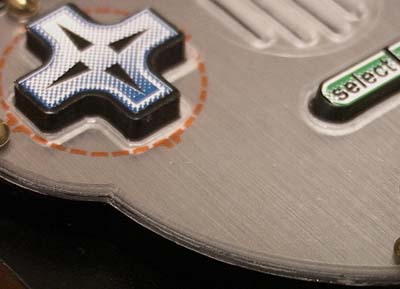
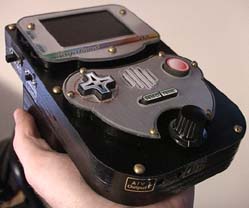
Another new thing on the ’03 are some of the materials. For the screen & control overlays, it uses clear graphics (as seen around the joypad) on the rear surface of a thin polycarbonate plastic. These graphics are then covered with brushed aluminum vinyl (yes, it does exist) and then attached to the unit. This gives the unit a look unlike any VCSp before it. The buttons are the same as the Rev 6 because I saw no reason to change them. (and I had a bunch laying around). I got tired of speaker holes being shaped like holes so I gave the Vagabond these 1930’s-esque slots. They also add to the overall vertical theme of the Vagabond.
Well, that’s pretty much all I have to say about the Vagabond which has finally been completed. I hope you’ve all enjoyed this little journey through the making of a portable unit and invite you to stay tuned for future updates of future units! Until then…