
What happens when you take 2 great tastes and mix ‘em together? Reese’s Peanut Butter Cups for one, and my new NEStari for another.

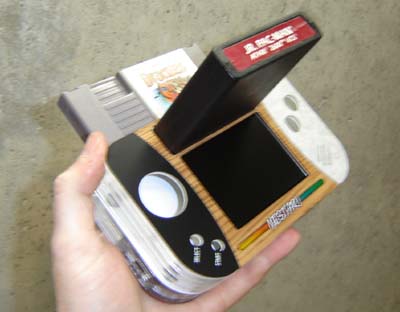
My NEStari portable. Click to enlarge and magically add a flashbulb.
I’ve been working on this unit for awhile now… you can read the full story after the jump. But yes, this is a combo NES and Atari 2600 portable that changes modes via a switch and uses a built-in rechargeable battery. How advanced is that? I’m sure you’re all amazed. Actually this probably the most difficult “small” portable I’ve ever done. Lots of crap to wire up. Oh and it also uses a hacked-up Flashback 2 (the Atari on a chip thing) instead of an original 2600. Been wanting to try one for a while now…
This unit has been sold, thanks for your interest! For the rest of the story click below.
The Flashback 1 was a “retro console thing” that I believe was done by Curt Vendel and some other folks. Little did anyone know that it actually contained a NOAC (NES-on-a-chip) with reprogrammed games. In fact, most “joystick games” use a NOAC, except the C64, which of course uses a… um…. COAC!

The FB2 box. Best pic I could manage, sorry.
Acronyms aside, the second model was called – get this – the Flashback 2. Which was an honest-to-goodness Atari on a chip. They even put pads on the board so the adventurous user could add a cartridge slot. Please don’t email me and ask how because you can find the procedure anywhere, like here.
I’d been meaning to hack up one of these things for a while now but I guess I’ve been too busy being a semi-famous game hacker / karaoke aficionado. Until one day, as fate had it, someone asked if I could hack their Flashback 2 for them. This was my big chance! I could check out the FB2… and get paid for it! I mean, why do something with your own money when you can do it with somebody elses? Just ask Uwe Boll!
The FB2’s motherboard is kind of weird… it’s skinny and long, single-sided with some of the switches on reversed single-sided sub-boards. Whatever. All I knew was that it was too big for a portable, so I chopped that sucker down something fierce.

First the left end of the board comes off. This contains the left joystick port and a few other connections.
Then the right side of the board gets the chop. It contains the video & audio amp, the right joystick port and some other stuff.

The FB2 board, chopped down “something fierce” and still functioning, like Megatron in the original Transformers movie
But then I hit a snag – the person didn’t want it chopped down into a portable! Clearly I was acting solely on instinct and hacked the unit up without even thinking. It’s the training – it turns you into a lethal hacking machine, devoid of any emotion!
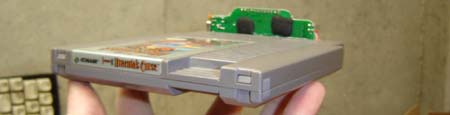
After recovering from my bout of mental instability I bought a replacement FB2 for the person, which cost me about 12 cents, and added a cartridge slot. Of course it had to be slide-in mount, if I was going to do a fairly common hack I was going to do it fairly well.

It’s out of focus because Bigfoot was in the room at the same time.
So as a result I had an extra hacked up FB2 laying around. Originally I was going to make a new NOAC NES and a FB2 portable as well. But I only had 1 screen at the time, thus I figured “Why not put ‘em together?” The logic was flawless.

A NOAC motherboard plugged into a cartridge. I was able to get this hack very small, which is good because it gives me more room for other things, such as the Flashback motherboard.
Top view. You can see the glop-top circuits of the NOAC on the motherboard.
The casing was made from acrylic cut with a laser engraver. I also choose to laminate the sides with real wood veneer, which was a lot more troublesome than it really should have been. Oh well.

Oh good, it fits. By the way this is one of my favorite NES games. As if you cared.
A middle plate sits atop the back of the unit. This plate will hold the FB2 motherboard as well as the battery packs.

A large slot at the base allows the NOAC board to stick up and through. Just have to make sure it doesn’t hit the LCD screen when the halves are put together.
Testing to see if the case fits together, more or less. Looks like it does, I can sleep soundly tonight.

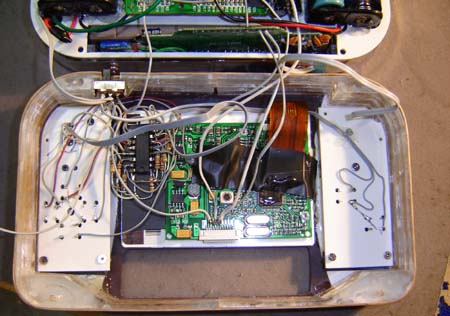
Above we see the FB2 board installed (using guess what?) onto the middle plate.Modified battery holders are here as well. This allows a person down the road to open up the unit and swap out the batteries, if need be.
For the cartridge slot itself I used one from an original Atari board (I had.. a few… laying around) and then ribbon-cabled this to the appropriate spots on the FB2 board.
The top half of the unit contains the 3.5″ LED-back-lit LCD screen, game controls, shift register (for the Nintendo controller) and the audio amp (not installed as yet in the above photo) It was important to keep all of this stuff as compact as possible so the batteries would have enough clearance.

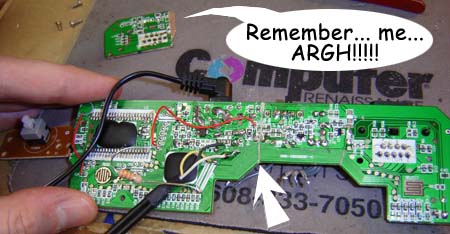
A close-up of the serial shift register used for the Nintendo controller, as described in my book. Each resistor is connected to +5 volts and “pulls up” the button. When the button is pressed it contacts ground and is thus “pulled down/low”, and the Nintendo knows a button has been pressed.

The Atari and NOAC both use the same buttons, with the exception of A, so it was necessary to isolate them from each other a bit. For the Atari the shift register needed to be left on, even if the NOAC wasn’t running, so that the input pins would remain in a state of high impedance (neither high nor low). If the shift register is not powered the pins all go low and thus the Atari controls won’t work.
For the Nintendo a bit of resistance had to be added between the FB2 and the buttons so the state of the not-running FB2 wouldn’t affect the shift register.

Above we see the front half of the unit nearly complete. In the lower right corner of the LCD we can see the 8 pin LM386 audio amp.

Testing the audio circuit. This kind of soldering is not for the faint of heart. Also, do not attempt if you have liver disease, or are nursing, pregnant or may become pregnant.
This was a bit of a stumper. On the FB2, audio comes from the Atari on a Chip as 5 signal lines, which are then mixed into a composite signal. Originally this was done on the right side of the board, so what I had to do was remove this section of board and re-attach it elsewhere.
")
This is always a welcome sight. No loose wises means the unit is done and ready to seal up! Time for some combo Atari – Nintendo action!

Back of the unit. Notice the nice woodgrain accent that represents… um… I dunno, let’s say life.

The unit charging. Please note – this portable cannot run Bioshock. Maybe next time.
![]()
Top of unit with cartridges removed.

Side showing power switch (left) charge jack (middle) and system switch (right)

Top view with cartridges.

Main view but with the flash turned on. Taking shots of black or shiny objects is tough, and this thing is both.
Well that’s all I have to saw about this thing. No I won’t make anymore, this was hard enough. If you’re thinking of making a portable Atari I’d actually suggest using original hardware, in some ways it’s more compact than the FB2, unless you’re OK with doing a lot of fine-detailed soldering work. But hey, I had to hack the FB2 at least once, right?
You can download a short video of this unit in action by clicking here. Enjoy, and we’ll see you next time.