
– The Story of the Neo Geo MVS Portable –
The Neo Geo Multi Video System (MVS) was an awesome arcade game system dating back to early 1990. The deal was the arcade owner could pop in cartridges to change the available game, thus making new titles easy to add. Of course the system had to be fairly powerful so it could hold up over the years and indeed it was. Games could be basically unlimited in size and also contained their own RAM, thus making forward compatibility quite possible. New titles are still available today (after 15 years!) and the system was strong in the arcades through pretty much all of the 90’s with titles like Metal Slug, Samurai Showdown and King of Fighters.
I’ve been a fan of the Neo Geo arcade machine ever since I first played it in the fall of 1990 at the University of Platteville, WI. (See, I can even remember where and when) I finally got my own Neo Geo arcade machine board in 2002 (though I’ve yet to build a cabinet for it) So it’s safe to say I’m a fan of the system.
Ok so a few months ago a guy emails asking if I could build a portable Neo Geo MVS system. I tell him it’s possible, but I’d have to work with some hardware to do tests. He kindly sends me a Neo Geo MV-1C, which is a 1-slot (holds 1 game) Neo Geo arcade motherboard from 1999, pretty much the last and newest model they made. If anything would run off a battery and be small enough that was it. Luckily I had a semi-built Neo Geo rig to test the new board with…
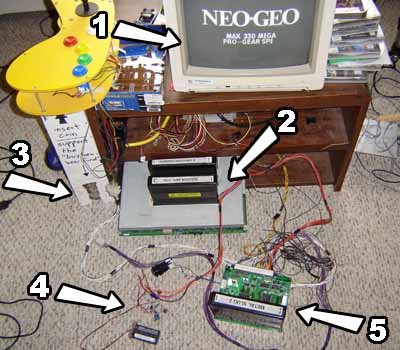
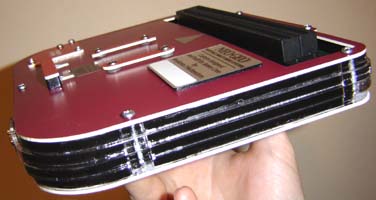
Above you can see my Neo Geo “setup” An MVS board takes +5 volts and +12 volts to run. For mine I just use an old computer power supply but that won’t work for a portable (unless you strap it to a belt or something, and have a REALLY long extension cord) Besides I wanted to use a 7.2 volt camcorder battery. I decided to use a couple of switching regulators – one that steps the voltage down to 5 volts and one that steps it up to 12 (Item #4 in photo) This then powers the small newer MVS board (#5). I tested it by hooking it up to my JAMMA cable which sends the picture to the monitor. I call this a “non-destructive” test – making sure it’s possible before I ruin the board by desoldering things and hacking portions off.
Also in the photo:
1) RGB Commodore Amiga monitor that I got for free, as I’m too cheap to buy an actual Well Gardner arcade monitor. Someday…
2) My Neo Geo 6-slot board. It’s… um… air cooled!
3) Cardboard and leaf-switch homemade “coin slot”, complete with Ragu spaghetti sauce jar posing as a coin bucket.
Ok so it works off a battery. Despite the “amp warnings of doom” in the manual the total draw for the board was only about 600mA. Heck that’s not so bad… I decided to proceed!
MEANWHILE… IN AN EMAIL….
BEN
I got the Neo Geo MV-1C board to run off a battery!
JAMES CREE, BENEFACTOR OF PROJECT
Awesome! Now can you add a new BIOS?
BEN, furrowing brow
What? Why?
JAMES, jumping up and down
Because then I can do cool stuff, like switch to AES [home console mode] and alter the DIP setting, stuff like that.
BEN
Sounds impossible! Can’t I just have an ADD COIN button? I mean, how cool would THAT be?
JAMES
PLEASE????????
BEN
Well, OK. I guess I’ve soldered harder things.
JAMES
YIPPEE!!!
So then I had to add a new BIOS. Luckily for me the old BIOS was surface mount, so I had to add the new one by wiring it manually to the board (after desoldering the old one) I guess I shouldn’t have flaunted doing a similar mod with the Radica Genesis… that’s probably how he knew I could do it! Curses!

This is a replacement BIOS for the MVS from www.universebios.com. It did encourage me to do this when I read on that site that this technique was “very difficult” to do. Ha! I scoff at difficulty! Scoff I say! Actually this BIOS is pretty cool, it can switch languages, arcade to home, mods, cheats and even a “Jukebox” that plays music from the game.
The screen to use was a no-brainer for me. The Sony PS1 Screen of course! See, an arcade machine uses RGB for the video. Not even “component” like a DVD player but real honest-to-goodness RGB. Well the awesome little Sony screen can use that as input! How’s that for cool?
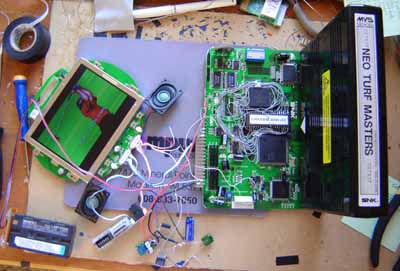
The first “test of REAL proof” The system running with everything hooked up. Worked fine, it was time to think about STEREO SOUND…
BEN
OK, it’s now working with a PSone screen. Real RGB, how about those apples?
JAMES CREE
Wow! (Or something to that effect)
BEN
And don’t worry, it’s gonna use both PSone speakers. A Neo Geo without stereo sound would be a mortal sin!
JAMES
Hm. The MV-1C board must be a mortal sinner then – it’s MONO ONLY.
BEN, in the style of Darth Vader
NOOOOOOOOOOOOOOOOOOOOOOOOOOOO!!!!!!!!!!!!!!!!!!!!!!!
JAMES
Yeah, pretty lame huh?
BEN
Darn it, there’s got to be stereo signals on there SOMEPLACE! I will find them or DIE TRYING!
After an exhaustive 5-minute search (during which I did not die) I found the stereo signals on the MV-1C:
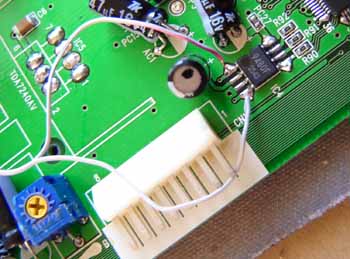
It’s this little 8 pin IC over by the main volume pot. Very similar actually to the spots to get stereo sound from a 1997 model mini-SNES. I also cut the traces after this IC that combined the signal and removed the large audio amplifier (the blank solder spots on upper left) I now had stereo! The Neo Geo MVS Portable would not commit any mortal sins on MY watch!
(For a high-res photo of the traces on the back of the board to cut, visit the Downloads page)
Now it’s time to cram all this stuff inside a case!
The case for the unit was cut out of my typical 1/4″ acrylic and engraving plastic. Once assembled I started stuffing parts inside, starting with the controls and speaker:
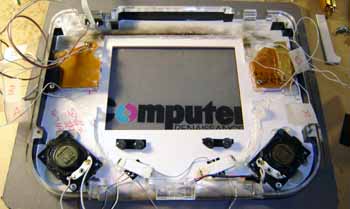
I was asked to use Japanese Super Famicon buttons for the unit, so I did… right down to the actual PCB they used. I guess that’s as close to the Super Famicon controller as I could get!
Next up is the 5″ PSone screen. This is all added in layers you see…
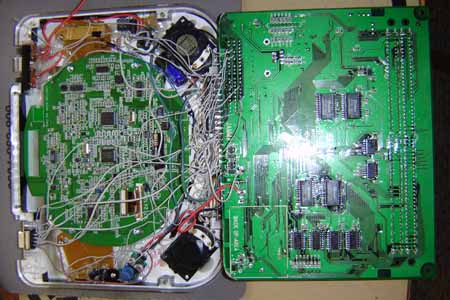
As parts are added some things are wired, typically grounds as it’s common for everything. At the bottom of the photo you can see the joystick connectors. This unit can take 2, count ’em TWO Neo Geo joysticks or gamepads. There’s also a SCART connector. I believe the idea is it can double as a home system – at least that’s what the person contracting the job said. It was a bit tricky getting all that in there but as usual I enjoyed the challenge.
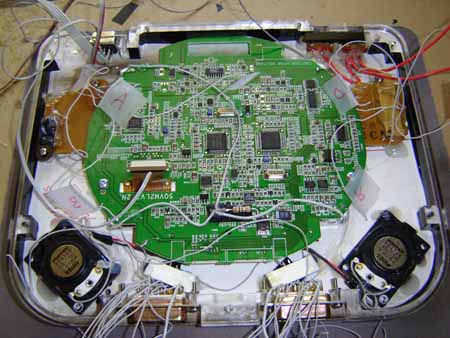
Next I attached the MVS board to all the guts in the front half of the case. Most of it was the joystick ports. Quite a mess but oh well, it’s INSIDE the unit so who cares?
The final bit was to fold the MVS board over onto the front case and its guts:
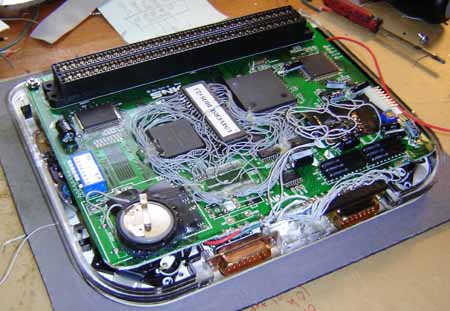
I also added a coin battery holder (accessible through a panel) so the BIOS battery can be changed if need be.
The rear half of the case contains the battery clip and external power jack. It is set on the assembly seen above and screwed shut. The end!
Well I hope this “making of” wasn’t too boring for everyone. If you have any questions about specifics of the Neo Geo hacking go ahead and shoot them my way, I’m also putting a bit RE: the stereo mod in the Downloads section (under “Videogames”) as mentioned before. Here’s some more photos of the finished unit:
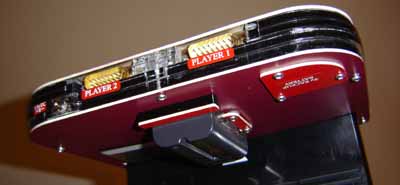
Base of unit, with Player 1 & 2 joystick posts and auxiliary power input jack.
Side view of unit. It’s only 1″ thick! I mean thin!
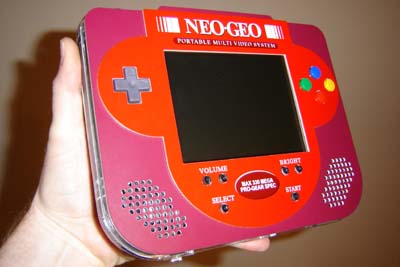
Another view of the front.
One thought on “Neo Geo MVS Portable”