on that note though, if anyone can post a few links about where to get real ABS cement (the black stuff hailrazer uses) and some actual hard filler (again, the stuff hailrazer uses would be best) it would be really helpful.
AngelArm1110's PS2p - the Kingdom PS2!!!!
Moderator: Moderators
-
AngelArm1110
- Posts: 233
- Joined: Fri Feb 06, 2009 8:35 am
- Location: Canada, eh?? (stereotype much??)
Re: AngelArm1110's PS2p - the Kingdom PS2!!!!
well here's a slight update, for anyone who cares; it looks like im gonna have to redo the front portion of my case. on the bright side though, in terms of things that set me back this really isn't that big of a deal. i still have a front piece from my spare lazer doodle (man im glad i bought that thing) its a little messed up, but only in the parts im gonna remove to put the screen and controller in. the thing i messed up on with the other case was i went way to crazy with my home made ABS cement, and i didn't think it was a big deal, but then the case began to warp as the acetone evaporated, and it got to the point that the screen and controller guts wouldn't even fit in anymore. so what i learned from this mistake, is to never use the ABS cement as hard filler, just use the hard filler as hard filler, 
on that note though, if anyone can post a few links about where to get real ABS cement (the black stuff hailrazer uses) and some actual hard filler (again, the stuff hailrazer uses would be best) it would be really helpful.
on that note though, if anyone can post a few links about where to get real ABS cement (the black stuff hailrazer uses) and some actual hard filler (again, the stuff hailrazer uses would be best) it would be really helpful.
-
AngelArm1110
- Posts: 233
- Joined: Fri Feb 06, 2009 8:35 am
- Location: Canada, eh?? (stereotype much??)
Re: AngelArm1110's PS2p - the Kingdom PS2!!!!
thats just the stuff i need, lol, thanks buddy 
-
AngelArm1110
- Posts: 233
- Joined: Fri Feb 06, 2009 8:35 am
- Location: Canada, eh?? (stereotype much??)
Re: AngelArm1110's PS2p - the Kingdom PS2!!!!
thanks a lot, but i should be fine until i decide to make another portable, which right now is a debate between N64 (darth 64 clone), Xbox lappy, or PS3 slim lappy. it all boils down to what i wanna play with the most, lol
-
AngelArm1110
- Posts: 233
- Joined: Fri Feb 06, 2009 8:35 am
- Location: Canada, eh?? (stereotype much??)
Re: AngelArm1110's PS2p - the Kingdom PS2!!!!
well, knight rider is already taken, so what else are you a fan of?? it could be another tv show theme, or you could just do one based on ur favorite 64 game. for example, im pretty sure shock slayer has done a zelda themed portable, maybe you could do a 007 themed portable..... The Golden Eye 64, lol, that do anything for ya??
-
AngelArm1110
- Posts: 233
- Joined: Fri Feb 06, 2009 8:35 am
- Location: Canada, eh?? (stereotype much??)
Re: AngelArm1110's PS2p - the Kingdom PS2!!!!
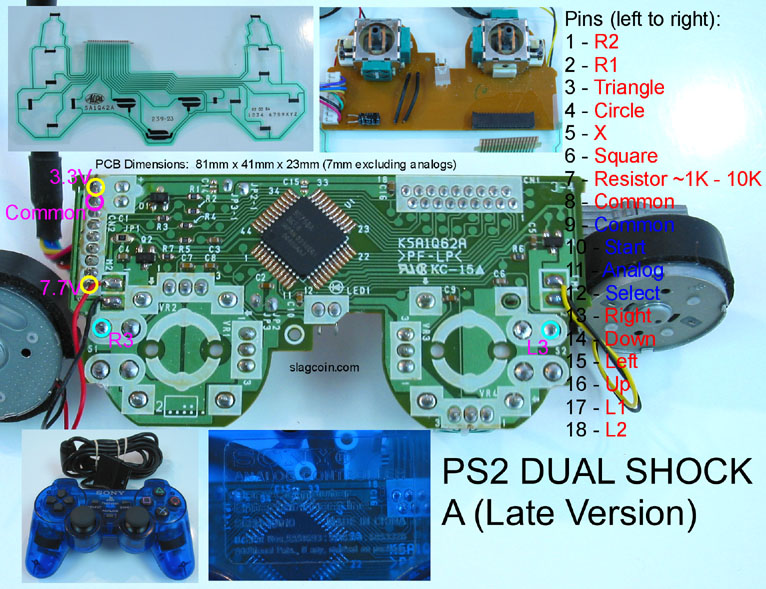
lol, sorry for the delayed reply (just got my web back). anyway, yes i did get the L/R buttons wired up and working, and i used this model and diagram:
http://slagcoin.com/joystick/pcb_diagra ... agram7.jpg" onclick="window.open(this.href);return false;
http://slagcoin.com/joystick/pcb_diagra ... agram7.jpg" onclick="window.open(this.href);return false;
-
AngelArm1110
- Posts: 233
- Joined: Fri Feb 06, 2009 8:35 am
- Location: Canada, eh?? (stereotype much??)
Re: AngelArm1110's PS2p - the Kingdom PS2!!!!
i found that one among hundreds (literally) in a huge bin at the hock shop one day, lol, it was a chanced encounter if i ever saw one
Re: AngelArm1110's PS2p - the Kingdom PS2!!!!
What if your ps2 has a bios v230? (I did and got myself a modbo isntalled  )
)
-
AngelArm1110
- Posts: 233
- Joined: Fri Feb 06, 2009 8:35 am
- Location: Canada, eh?? (stereotype much??)
Re: AngelArm1110's PS2p - the Kingdom PS2!!!!
there isnt really much to it, i'll assume by now you have all the pins removed from the from the front of the main board, the ones that connected that big black piece of plastic known as the controller and memory card slots. and as a result you now have 2 rows of holes, one for the controllers, and one for the memory cards. well all you really need to do is take the memory card out of its own plastic casing, so that you have just the little PCB inside. from there you just lay it flat on the PS2 mobo, near the memory card pin holes, and solder it to the main board accordingly.
maybe this pic will shed some light on the idea
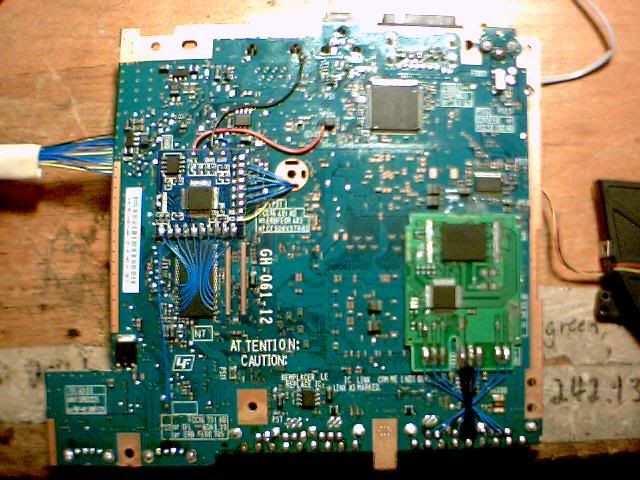
you see how i have the card laying flat against the main board, with those thin blue wires going from the pads on the card, to the pin holes on the main board?? and notice how they criss-cross in the center, this is because laying the card flat on the board like i have it is actually backwards to the way it normally connects to the PS2 mobo, but like i said, if you just just solder the pads to the pin holes accordingly it words just the same.
here is a little diagram to clarify the soldering process:
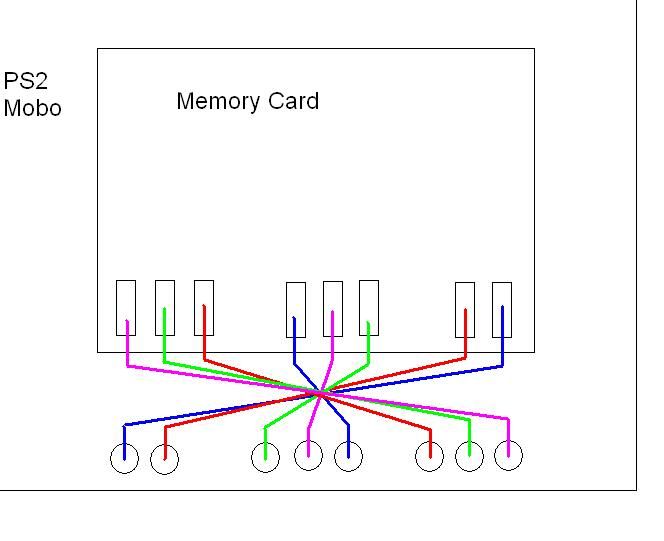
FYI, the different colors of the wires doesn't mean anything, its just to help with the idea that they criss-cross. and also, it would be a good idea to put a layer of electrical tape, or just some kind of non-conductive substance on the back of the memory card, to prevent any shorts while it lays on the PS2 mobo. and obviously you should use a little hot glue to hold it there, lol. and finally, when you solder the wires to the holes on the PS2 mobo, you should make sure to put the wire through the holes, as both sides of the mobo have traces that connect to the pins, and this will ensure that everything is connected properly.
well i hope that helps, and as always, if you have any further questions, dont hesitate to ask
maybe this pic will shed some light on the idea
you see how i have the card laying flat against the main board, with those thin blue wires going from the pads on the card, to the pin holes on the main board?? and notice how they criss-cross in the center, this is because laying the card flat on the board like i have it is actually backwards to the way it normally connects to the PS2 mobo, but like i said, if you just just solder the pads to the pin holes accordingly it words just the same.
here is a little diagram to clarify the soldering process:
FYI, the different colors of the wires doesn't mean anything, its just to help with the idea that they criss-cross. and also, it would be a good idea to put a layer of electrical tape, or just some kind of non-conductive substance on the back of the memory card, to prevent any shorts while it lays on the PS2 mobo. and obviously you should use a little hot glue to hold it there, lol. and finally, when you solder the wires to the holes on the PS2 mobo, you should make sure to put the wire through the holes, as both sides of the mobo have traces that connect to the pins, and this will ensure that everything is connected properly.
well i hope that helps, and as always, if you have any further questions, dont hesitate to ask
Re: AngelArm1110's PS2p - the Kingdom PS2!!!!
Now If only I could get hold of a laser doodle for my project 
Anyway I think where you have the PS button from the PS3 controller, you should Instead put in a similar, transparent custom button, with the Kingdom Hearts crown on it, and put a LED power indicator behind it. Would be a nice touch but not sure if making the button would be easy, but otherwise its looking great so far, and awesome work with the soldering, I'm loving it all!
Anyway I think where you have the PS button from the PS3 controller, you should Instead put in a similar, transparent custom button, with the Kingdom Hearts crown on it, and put a LED power indicator behind it. Would be a nice touch but not sure if making the button would be easy, but otherwise its looking great so far, and awesome work with the soldering, I'm loving it all!
Anybody know where I can get a laser doodle in the UK?
-PM me!
-PM me!
-
AngelArm1110
- Posts: 233
- Joined: Fri Feb 06, 2009 8:35 am
- Location: Canada, eh?? (stereotype much??)
Re: AngelArm1110's PS2p - the Kingdom PS2!!!!
lol, if i had to put a percent on it i'd say im back to 75%. but mark my words i will finish it one day, i just need to find the time, lol
Re: AngelArm1110's PS2p - the Kingdom PS2!!!!
What are the dimensions of your PS2 mobo? And good luck on the portable!AngelArm1110 wrote:lol, if i had to put a percent on it i'd say im back to 75%. but mark my words i will finish it one day, i just need to find the time, lol


-
AngelArm1110
- Posts: 233
- Joined: Fri Feb 06, 2009 8:35 am
- Location: Canada, eh?? (stereotype much??)
Re: AngelArm1110's PS2p - the Kingdom PS2!!!!
thanks!! and the dimensions of the mobo are as follows:
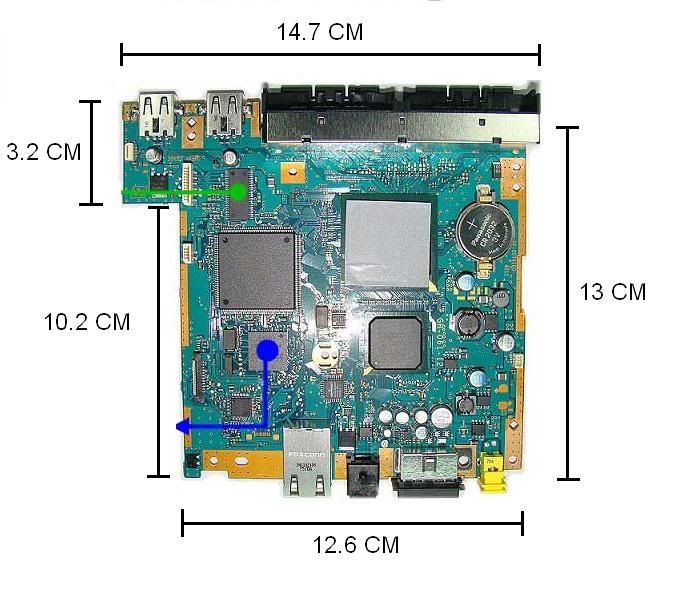
hope thats what you need
hope thats what you need
Re: AngelArm1110's PS2p - the Kingdom PS2!!!!
Thanks! Do you think its possible to get any of those dimensions down to 4"???AngelArm1110 wrote:thanks!! and the dimensions of the mobo are as follows:
hope thats what you need
Re: AngelArm1110's PS2p - the Kingdom PS2!!!!
Can anyone tell me the power specifications to the battery ben used, i have the same battery pack however i misplaced the wall adaptor.
the battery is known as initial universal portable dvd battery. I have looked all over the internet however cannot find this information. If anyone has this same please help.
AngelArm i know from the beginning of your log you had chosen to use this batter pack as well.
the battery is known as initial universal portable dvd battery. I have looked all over the internet however cannot find this information. If anyone has this same please help.
AngelArm i know from the beginning of your log you had chosen to use this batter pack as well.
-
AngelArm1110
- Posts: 233
- Joined: Fri Feb 06, 2009 8:35 am
- Location: Canada, eh?? (stereotype much??)
Re: AngelArm1110's PS2p - the Kingdom PS2!!!!
AngelArm1110 wrote:its approximately 6"x3.5"x1", and it holds 5400 mAh, and outputs 9v!