http://forums.modretro.com/viewtopic.ph ... 4776#p4776" onclick="window.open(this.href);return false;
Maybe you have seen the discussion in ShockSlayer's GCP thread. We have figured out how to make an easy low voltage indicator for your portable.
If you haven't seen it, where have you been for the past 2 days!?
Here is a guide telling you how to add one to your portable. Note that the best time to make this is when you have your portable's guts done, so you can accurately measure the low-voltage point of your batteries.
Here is a list of parts you need:
1W 1k resistor
2.7v LED (Regular red LED)
A couple zener diodes (more on that later)
2N3904 transistor or equivalent (like 2N2222 or 2N4401)
Optional:
2.7v LED (Regular green LED)
50-100ohm resistor
To start, you should have most of your portable done, i.e. the functioning guts of it, all running from the batteries. Run your portable until it dies, and measure the voltage that the batteries are at.
For example, say that you have 7.4v li-ion batteries that are really about 8.3v when charged. If you were making, say, an N64 portable, everything might shut off when that batteries got to 7.0v. Record that voltage and remember it. Add about 0.2v to it to get the voltage you would want the low battery light to come on.
So what we have now is the voltage that everything dies at, 7.0v. Add 0.2v to it, so we have 7.2v. That is the voltage we want the LED to come on at. Remember, these are just an example. If you have 12v batteries for something like a Gamecube portable, your batteries might die at 10v. You would then add 0.2v and get 10.2v.
Now, you need to buy zener diodes. If you want to know how these work, look at the second-to-last paragraph. If not, you aren't missing anything important.
You can find zener diodes on eBay. There are 18 standard voltages you can use: 2.0v, 2.2v, 2.4v, 2.7v, 3.0v, 3.3v, 3.6v, 3.9v, 4.3v, 4.7v, 5.1v, 5.6v, 6.2v, 6.8v, 7.5v, 8.2v, 8.7v, and 9.1v. You will need to find which ones to add together to get the voltage you want. For my example, we could add a 2.2v and a 5.1v diode to get 7.3v, or a 4.3v and a 3.0v - quite close to the voltage we want. For the 10.2v example, you could use two 5.1v diodes. You can also use a variable resistor to fine-tune this voltage, more on that later.
To find the diodes, search "zener diodes X" where X is the voltage you want, like 2.2v or 5.1v. Here is an excellent store that sells all those voltages of diodes.
The other electronics are easy to get. If you have a RadioShack near you, good. You'll be able to pick up everything you need for pretty cheap. Get a 1W 1k resistor. It MUST be at least 1 watt because if it isn't, it will heat up and possibly catch fire - certainly something you would not want inside your portable. What this resistor does is act as a load for the batteries, so that under normal conditions, the battery is not just shorted to ground. (See the last paragraph)
You need a standard switching transistor, most will work fine. You may have some lying around. You need a 2N3904, 2N2222, 2N4401, or any NPN transistor. You might find one in some broken electronics.
You also need an LED, obviously. Get a regular 'ol red LED; these take about 2.7v.
The optional pieces are if you want a two-LED indicator, like on the Gameboy SP or Nintendo DS. These are green when all is good, then turn red when the battery is low. You could either use two separate LEDs or a bi-color LED, both you can get at RadioShack, but the bicolor ones are almost $5 apiece.
Anyway, for the optional stuff you'll need a 50-100ohm resistor and another LED.
Now about actually building the circuit. Here is the diagram for the one-LED one:
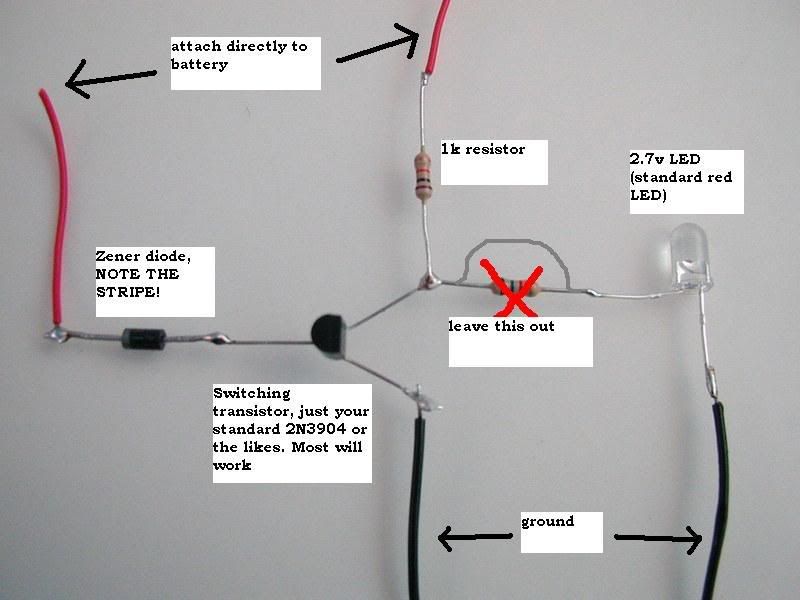
It is a very simple circuit. Note the direction of the diode; the stripe is critical. If you get this wrong, the circuit will not work. If you have two or more diodes, put them in series.
EDIT: I tried this circuit and could not get it to work, the green LED draws too much power compared to the red one and it does not function. Please disregard this diagram until I figure out a better way for this.
Here is how you would have a 2-LED indicator:
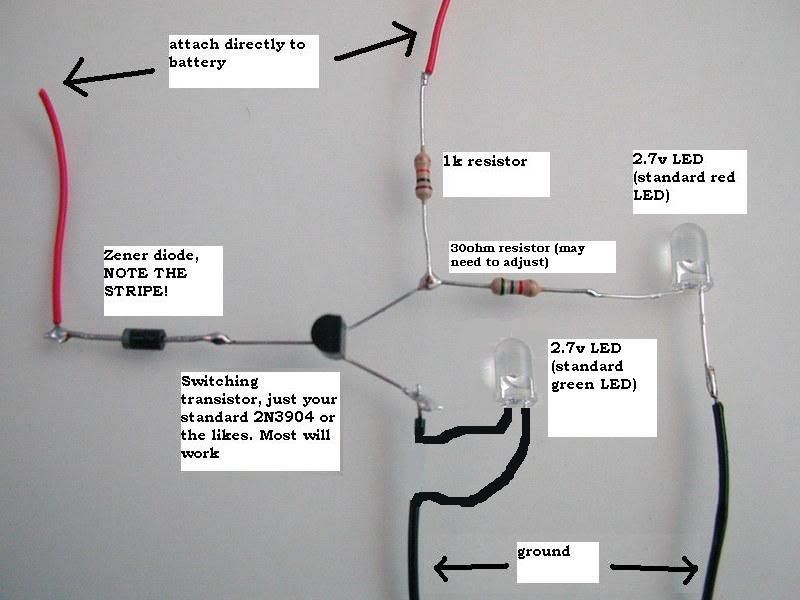
The resistor right before the LED does not have the proper color coding, it is just a random resistor, so don't go by it. A 100ohm resistor would have a color code of Brown-Black-Brown-Gold.
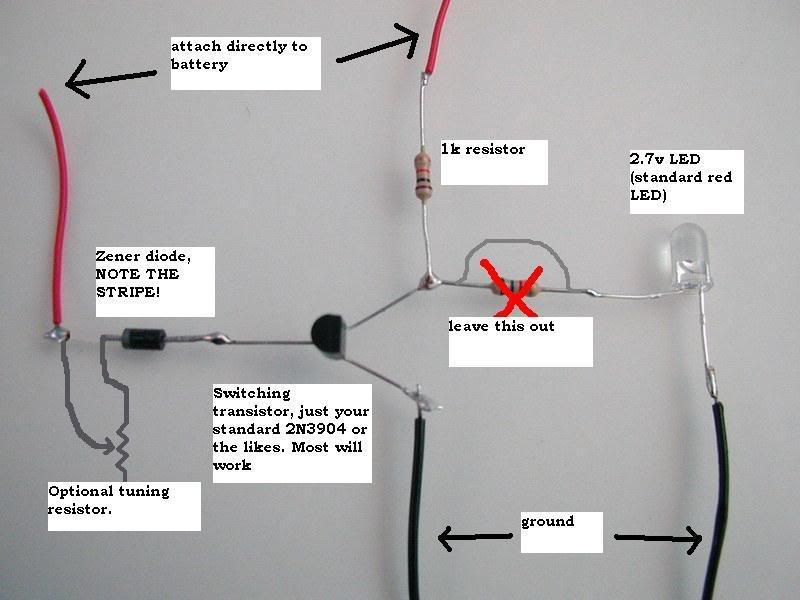
If you are having problems with getting the indicator to go off at the right time, this will fix it. This is only if it goes off too late for your liking.
This modification is easy. Just add a 10k variable resistor between the diode and the battery. Adjust as needed. The higher you set it, the sooner the indicator will go off.
Thank you for looking. Hope you find this information useful!
How Zener Diodes Work:
Zener diodes are just like normal diodes except with one difference. Their breakdown voltages. The breakdown voltage of a diode is the voltage it takes to pass a current backwards through a diode. The problem with normal diodes is that this voltage is very high, and when you reach it, it damages the diode. Zener diodes are specially made to have low breakdown voltages, like 5.1v or 3.3v, and they are not harmed when you reach it. So say you have a 5.1v zener diode. To pass a current backwards through it, you would need at least 5.2v.
How This Circuit Works:
This is basically a zener diode combined with a NOT circuit. For the example, we will say we are using 7.5v li-ion batteries with the zener voltage at 7.3v. So when the battery is in the "good" state (more than 7.3v), current is getting past the diodes and to the transistor. Electricity always takes the easiest route, so it goes straight to ground. When the batteries reach the critical stage (less than 7.3v) then current no longer passes through the diodes. The transistor is disables, so the only route for the electricity to take is through the LED.
Final note: The amp draw of the one-LED circuit is 40mA when the battery is good, and 20mA when it is dying.


