Retro Duo project! NEW PIC pg6! ALMOST DONE
Moderator: Moderators
-
Triton
- Moderator
- Posts: 7398
- Joined: Mon May 24, 2004 12:33 pm
- 360 GamerTag: triton199
- Steam ID: triton199
- Location: Iowa
- Contact:
its some generic 2.5" lcd (dash backup monitor) from china, it draws ~200mah
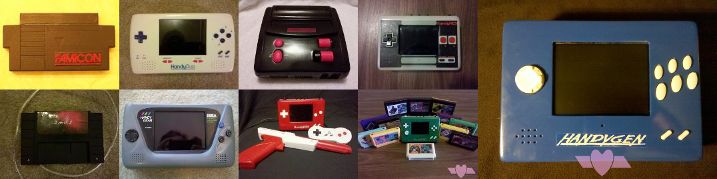
also: ZOMG UPDATE!!!!1!!!2 i apologize in advanced for the ABYSMAL image quality, i will take pics with a camera that doesnt suck (this one has broken zoom and a failing CCD lol) later on today or when i get the case closer to finished! i just threw a quick crappy coat of paint on it to get it all one color this is NOT the final coat!


ph33r my l33t b0nd0 sk1LLz
also: ZOMG UPDATE!!!!1!!!2 i apologize in advanced for the ABYSMAL image quality, i will take pics with a camera that doesnt suck (this one has broken zoom and a failing CCD lol) later on today or when i get the case closer to finished! i just threw a quick crappy coat of paint on it to get it all one color this is NOT the final coat!
ph33r my l33t b0nd0 sk1LLz
Visit us at Portablesofdoom.org
looks pretty good, couple of questions, though:
What's the deal with the top of the thing? it looks, well, broken there.
The curved line going through the controller is separated in the middle (i'm guessing that has something to do with splitting it in half and replacing the middle with bondo. Do you plan on doing anything to get that line all the way across?
-
Triton
- Moderator
- Posts: 7398
- Joined: Mon May 24, 2004 12:33 pm
- 360 GamerTag: triton199
- Steam ID: triton199
- Location: Iowa
- Contact:
the weird broken spot isnt broken it isnt finished yet lol, i had to make that protrusion to get the board to fit, on the board is a section that sticks out like half an inch that had the original power switch on it, totally threw a wrench in my design so i had to build the case around it, just framed that part in yesterday and am going to finish that section today. when the two halves of the case are together it doesnt look as stupid lol
as for the line it will probably stay like it is because as it sits now the case has two roughly equal semi circles on either side and i think it looks kinda cool lol. doing that accurate and fine of a line and getting it to match would be really hard to do.
as for the line it will probably stay like it is because as it sits now the case has two roughly equal semi circles on either side and i think it looks kinda cool lol. doing that accurate and fine of a line and getting it to match would be really hard to do.
Visit us at Portablesofdoom.org
-
lovablechevy
- Portablizer Extraordinaire
- Posts: 1104
- Joined: Wed Nov 01, 2006 3:09 pm
- Location: busy with a project
- Contact:
looking pretty good! can't wait to see more! 
they call me the Queen of Bondo, though maybe i should be called the Queen of Epoxy Putty
current project - code name: blue mushroom!
current project - code name: blue mushroom!
-
Triton
- Moderator
- Posts: 7398
- Joined: Mon May 24, 2004 12:33 pm
- 360 GamerTag: triton199
- Steam ID: triton199
- Location: Iowa
- Contact:
woo small update, my lipoly batteries came today, now i just need to figure out how the hell to get them to fit inside the case along with everything else lol
Visit us at Portablesofdoom.org
-
Triton
- Moderator
- Posts: 7398
- Joined: Mon May 24, 2004 12:33 pm
- 360 GamerTag: triton199
- Steam ID: triton199
- Location: Iowa
- Contact:
there were more traces thru there than i really wanted to mess with, the power and reset switches plus several smd resistors and things like that, i trimmed off some of it tho
Visit us at Portablesofdoom.org
-
Sharp Sapphire
- Portablizer
- Posts: 415
- Joined: Fri Feb 22, 2008 9:40 pm
the power/reset switch on the RD is seriously easy to remove... i just used a pair of plyers. No desoldering.. worked just fine and jumped the 2 traces to complete the circuit.. although the LED doesn't work after that
Things I need to purchase for my NES Laptop:
1X PSone screen
6X 1.2v 3500mAh sub-C's
1X 1/8'' to RCA stereo Adapater
1X Radioshack repair kit
..yeaaaaah...
1X PSone screen
6X 1.2v 3500mAh sub-C's
1X 1/8'' to RCA stereo Adapater
1X Radioshack repair kit
..yeaaaaah...
-
Triton
- Moderator
- Posts: 7398
- Joined: Mon May 24, 2004 12:33 pm
- 360 GamerTag: triton199
- Steam ID: triton199
- Location: Iowa
- Contact:
yes removing the switch etc was easy but actually removing that section of the board  i didnt want to risk breaking my 50$ retro duo!
progress update!: i got my li-poly batteries not long ago and have been working on making them fit! today so far i have relocated almost every capacitor on the board to make room for the batteries, will continue working on making the case look good, on the agenda is more bondo and finishing filling holes and stuff like that!
progress update!: i got my li-poly batteries not long ago and have been working on making them fit! today so far i have relocated almost every capacitor on the board to make room for the batteries, will continue working on making the case look good, on the agenda is more bondo and finishing filling holes and stuff like that!
Visit us at Portablesofdoom.org
-
Sharp Sapphire
- Portablizer
- Posts: 415
- Joined: Fri Feb 22, 2008 9:40 pm
Ah, thats good then.. cause i fried one of mine!Triton wrote:yes removing the switch etc was easy but actually removing that section of the board
Things I need to purchase for my NES Laptop:
1X PSone screen
6X 1.2v 3500mAh sub-C's
1X 1/8'' to RCA stereo Adapater
1X Radioshack repair kit
..yeaaaaah...
1X PSone screen
6X 1.2v 3500mAh sub-C's
1X 1/8'' to RCA stereo Adapater
1X Radioshack repair kit
..yeaaaaah...
-
Life of Brian
- Moderator
- Posts: 2867
- Joined: Wed Aug 03, 2005 5:55 pm
- Location: Oklahoma
- Contact:

-
Triton
- Moderator
- Posts: 7398
- Joined: Mon May 24, 2004 12:33 pm
- 360 GamerTag: triton199
- Steam ID: triton199
- Location: Iowa
- Contact:
yesterday the case went from ~80% constructed to over 95% done! all the holes are filled and the back cover panel is now fully put together and all thats left constructionwise on the case is to drill a couple more holes! will be posting pictures in a day or 2!
Visit us at Portablesofdoom.org
-
Triton
- Moderator
- Posts: 7398
- Joined: Mon May 24, 2004 12:33 pm
- 360 GamerTag: triton199
- Steam ID: triton199
- Location: Iowa
- Contact:
HOLY CRAP CRAPPY NEW PICS! in case you are wondering NO this is NOT done yet and NO this is not the final color combo


still have sanding and probably more bondo to do and getting it all nice and smooth and have a grand total of 5 holes left to cut (contrast bright lcd power start and main power
still have sanding and probably more bondo to do and getting it all nice and smooth and have a grand total of 5 holes left to cut (contrast bright lcd power start and main power
Visit us at Portablesofdoom.org
-
cowsgoquack101
- Senior Member
- Posts: 1981
- Joined: Thu Aug 04, 2005 9:21 am
- Steam ID: cowsgoquack101
- Location: Cold, grey Indiana!