How do I get composite
video from my Atari 2600 Junior?

That's a good question!
To get composite video from an Atari 2600 Junior, you will need:
A 22-ohm resistor.
Two 1-k potentiometers.
Solder and a soldering iron
Wires
RCA phono plugs (the kind you plug video cables into)
The components to get composite video hook up to the same spots on the Stella chip on all three model Ataris. But in each model, the Stella chip is in a different position, so the pins aren't in the same place all the time. Also the CHROMA lead is in a different place on each model.
On the front of the Atari 2600 Junior board, look in the lower right-hand corner, below the RF box. You should see something that looks like this...

Hook up wires to these 2 points. You can connect the
wires to the other side of the board if you wish, of course. Now you have the audio and chroma
connections.
FUN TIP: If you de-solder that little chip you see in the upper left hand corner of this picture, it will actually make the video signal better. Must be some sort of RF filter or something. BUT IN THE 21st CENTURY WE DON'T NEED SUCH GARBAGE!
To make audio work, connect it to the center tap of an RCA phono plug. Then, connect the outer edge of the RCA plug to the ground of the Atari board. Ground is any spot on the Atari circuit board that touched the metal shield. (anywhere on the metal band that goes around the edge of the circuit board)
Take a look at this. Here are which pins are which on the Atari 2600 Junior's Stella chip. The Stella chip on the 2600 Junior is upside-down compared to the other models...

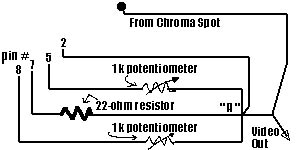
Here is a super-high-tech schematic of how to hook up the rest of the video:

I will explain it in detail. Connect some wires to pins 5, 7
& 8. Attach each of those wires to the appropriate item;
Pin 5 goes to a 1 k potentiometer. Pin 7 goes
to a 22-ohm resistor. And Pin 8 goes to a 1 k potentiometer.
Then, connect the other end of each potentiometer to a common wire,
labeled spot "A" on this diagram. Connect Pin
2 to spot "A" as well. (Pin 2 doesn't need a resistor
or anything on it, it's just video sync) Connect the "Chroma"
wire to spot "A" also. Now you have composite video!
To make it work, hook the composite video lead into the center tap of an RCA phono plug. Now attach a wire to the outer side of the RCA plug. Connect this wire to the Atari's ground.
Now if you plug in a video cable and attach it to a monitor, you will have VIDEO! Yippee! Adjust the potentiometers until the video looks right. Use a game like Pitfall that has a lot of color for a good calibration.
