
You know I really like beer but I think my overall brain cel count is OK because I can still remember the first time I played a Neo Geo arcade machine. It was the fall of 1990 at the university of Platteville Wisconsin. Some sort of parade or something, I was there for high school band. Anyway since 80% of high school consists of goofing off we were all in the student commons area. And they had a Neo Geo machine with I think Magician Lord, Baseball Stars, Nam 1975 and The Super Spy.
Naturally being a die-hard EGM reader I remembered all the ads for the Neo Geo. Specifically the one where a Genesis was represented by a plain hot dog whilst the Neo Geo was this overloaded Coney Island-esque cardiac-arrest-on-a-bun monstrosity. (The Nintendo, being 8-bit, was something along the lines of a wilted, sat-in-the-case-all-day gas station dog) So yeah, I knew the system was supposed to kick butt (or at least taste good) and upon playing one found it to be true!
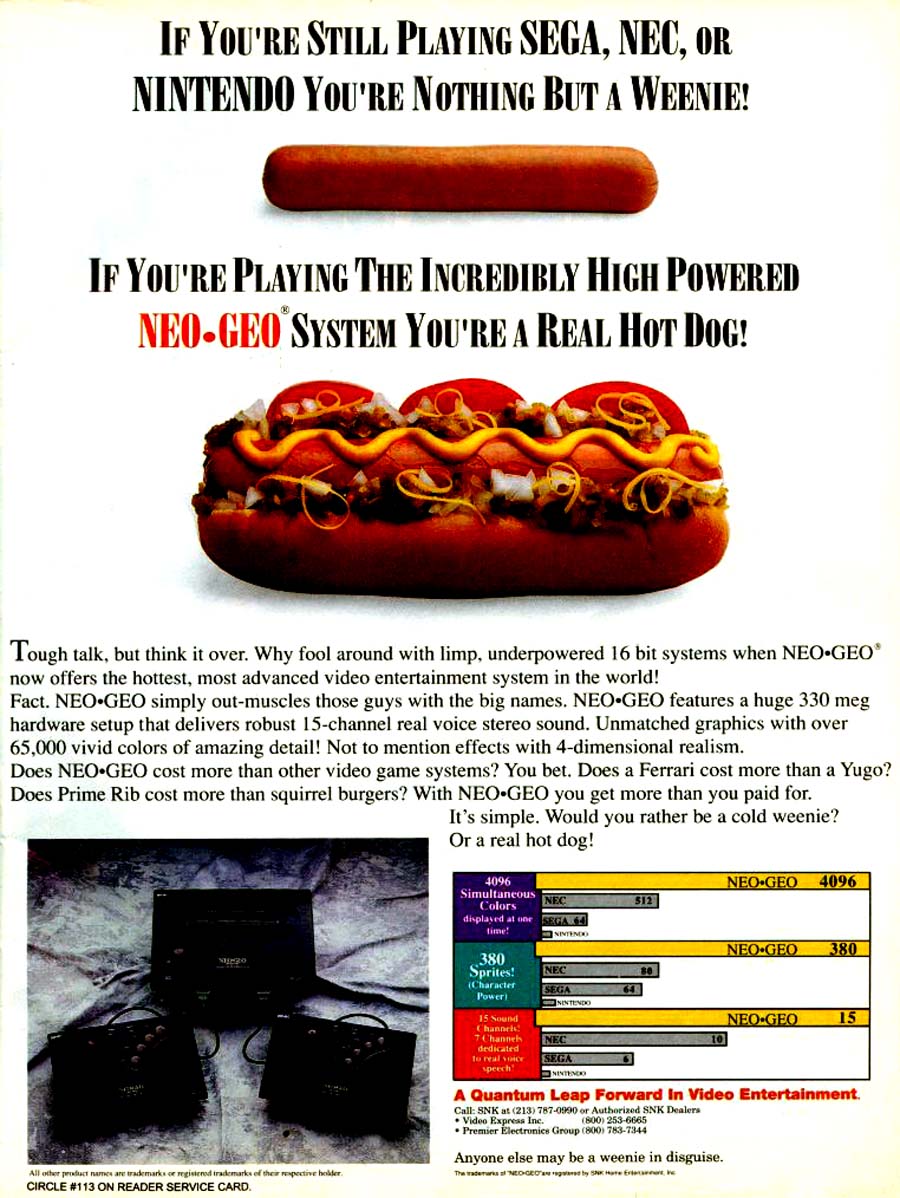
The actual ad, found during an archaeological expedition in a warehouse slated for destruction. Click to enlarge.
So from then on my dream was to own a Neo Geo! The home system was a LOT of money back then, like $500 or so, and it was certainly out of my reach. As the years passed I played Neo Geo arcades whenever I could, Samurai Showdown, the kind of weak World Heroes, etc. Probably the last Neo I saw in an arcade was in 1996 when I was filming helicopters in Wisconsin Dells on the 4th of July.
Years passed… A friend of mine introduced me to Metal Slug. He had it for the Saturn but said it came from the Neo Geo. “Wow the Neo Geo has new games?” I thought. “That sure puts the Neo in Geo!” In the following years Neo Geo emulators came out and I was able to relive some of the glory days of the system, while playing stuff I’d never seen in the arcades (like the awesome Neo Turf Masters and of course the Slug series)
Finally in 2002 I broke down and bought myself a 6 slot Neo Geo arcade motherboard, controls and some games. I could play it on a 1986 model Commodore Amiga monitor, which I believe was a whopping 12 inches in size. Still it was fun, even if I had to rub wires together to “insert coin”
Still more years passed… then my lucky day! Someone saw my site and wanted a Neo Geo Portable – and they offered me something I couldn’t refuse, an arcade monitor! Thanking my lucky stars I said yes and promptly began designing my Neo Geo MVS Arcade Machine!
Designing the Neo Geo Arcade Machine
Not owning Autocad I booted up old Adobe Illustrator 10 and went to town! I didn’t see why this would be any different than the portables I design, just a lot bigger and well, not portable. And made of wood. Ok so it’s a lot different, so what?

Line drawing of design, side. With “Top” and “Bottom” labeled, apparently in case I accidently designed this standing on my head.
I design and build a lot of videogame-related stuff but sell almost all of it. This Neo Geo, on the other hand, was just for me! (HA HA HA HA HA HA!) Therefore the control height was designed for someone 5’8″ and the 4 action buttons were laid out to match the spacing of my fingers. Ridiculous, yes, but why not?
I designed the cabinet to be assembled like cheap furniture from Target (um, not that I own any of course!) Channels/grooves would be routed in the side panels and the middle panels (really technical names, eh?) would slide into these grooves and be wood glued / nailed in place. Originally I planned to have the cabinet be all woodgrain (oak plywood) but when I did a layout like that I hated it. So I decided to go with a color. Red is the typical Neo Geo color but it’s kind of gaudy. The solution was a darker shade of red and gradiations into black, to mute the overal “brightness” of the red.
The next step was to rout the wood. I used Greeley’s big CNC machine for this, entire 4’x8′ panels can be cut at once! I ended up using 1.5 sheets of 1/2″ (middles) and 1.5 sheets of 3/4″ (sides)
(Photo unavailable as I took it with my camera phone and it looks like fish-eyed wide-angle crap)
I then piled all the pieces in the back of my friend’s vintage 1989 Ford Ranger truck (which still has at least 10% of its original side panels and windows) and drove it all to The Barn for assembly.
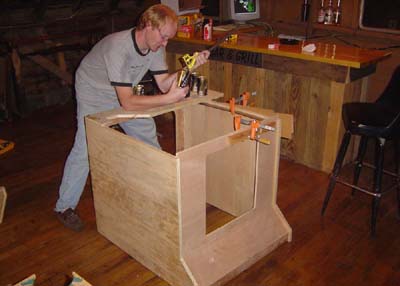
Here’s the bottom of the cabinet, and me opening a can of MGD with a compound miter ruler thing. Unfortunately the beer consumption caused a few errors in the bottom of the case, though none are apparent in the final product (fixed the day after)
See the idea is the cabinet is in two pieces, upper and lower. There’s a lip to hold them in place. This allows a person (or rather 2 people as each half is still heavy) to lift the pieces apart and move it a good deal easier than a whole cabinet would be.
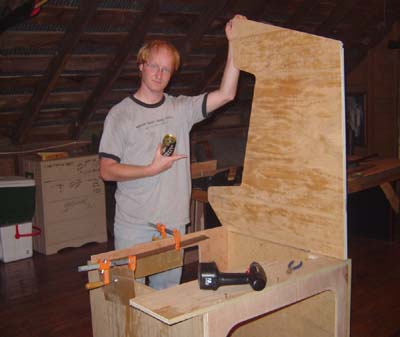
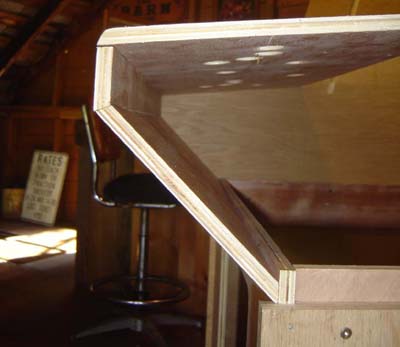
Here you can see the grooves for the middle pieces. I used only a few angles in the design, 45 for the front slopes, 6 for the controls and 15 for the screen/speakers/top of unit. A tablesaw was used to cut angles on the ends of the middle pieces so they’d fit together nicely. In the background of this shot you’ll see my ever-present laptop – after the mistakes the night before we decided to keep the original design files open for reference at all times.
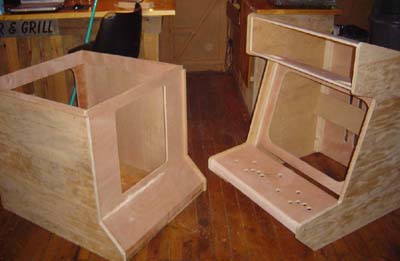
Here’s the top and bottom pieces assembled. Each is quite solid and nailed/screwed/glued to oblivion.
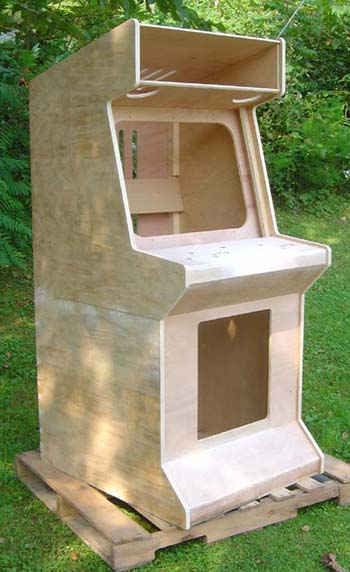
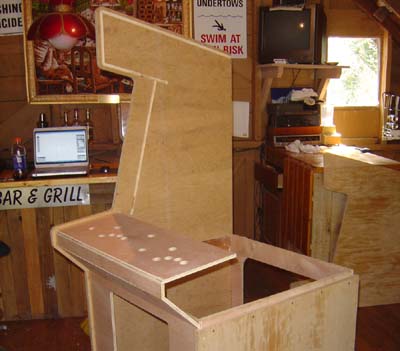
The assembled wood cabinet. It looks pretty cool right now…
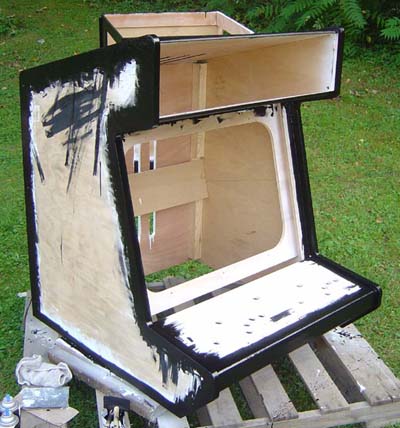
…but not after we paint it! The sides are going to have brushed aluminum panels so only the edges need paint. Still in this form it looks pretty crappy.
Once the 5 or so coats of paint dry it gets loaded up in a truck and I drive it back to Verona. Luckily it fits through all the doors in my apartment building (I measured A FEW of them before I did the design:) and I can begin the detailing process and final assembly…
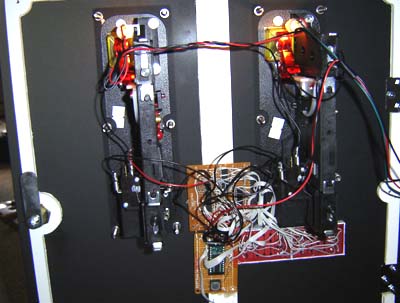
So with the cabinet built I began installing all the guts. This was pretty easy, just lots of Molex disconnects (so it can be moved in 2 pieces) electronic tape and screwing. Here’s some various shots of the cabinet:
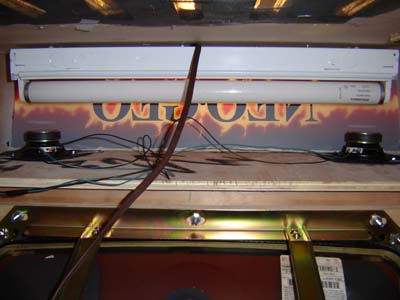
Inside the marquee light – a $5 cheapy from Menards. Good enough for me! You can also see the speakers which thankfully don’t block the light or make shadows.
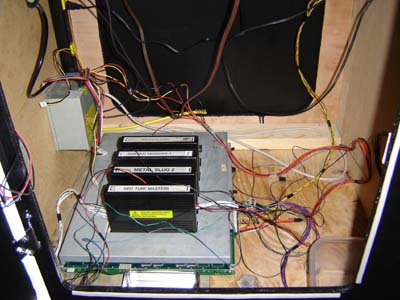
This photo reminds me of eBay for some odd reason… Anyway there’s a power strip (rewired to a big toggle switch on the top of the unit for “main power on”), the AT computer power supply, the 6 slot MVS board and a load of wiring. Yeah a person can buy fancy power supplies for arcades, but an old AT computer power supply has everything you need and you can get them practically for free.
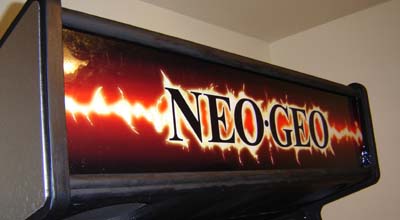
For some reason I wanted lightning in the logo, along with red gradients. It actually looks pretty cool, considering lightning is usually reserved for things like tattoos and motorcycle airbrushing. I mulled the idea of having the phrase “Why Electricity Was Invented” under “Neo Geo” but decided that was pretty dumb. This is actually a double-layer transparent graphic (to ensure rich color) with white translucent vinyl backing on the rear side of the clear acrylic.
Most of the graphics (with the exception of the oval logo below) were done on a wide-format Mimaki printer. I really ramped up the CMYK values to get rich black shades. Sure it meant thick layers of ink but it dries EVENTUALLY. (That said I waited several days after printing before applying or working with the graphics)
![]()
This logo doesn’t really match the scheme of the marquee but I don’t care – I like ovals! Besides someplace on this thing I had to tout “MVS – Multi Video System” I used 2 fonts for the whole project, Times New Roman & Arial, based off the boot-up logo in a Neo Geo game. In that “Neo Geo” is Times, “Max 330 Pro Gear Spec” is Arial.
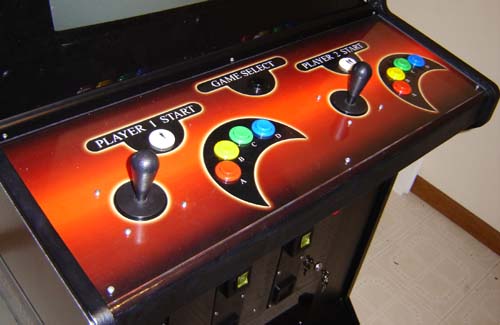
The controls have the same theme as the top marquee. The vinyl print graphic is under the 1/8″ acrylic top layer. I did a layout of this with lightning connecting all the controls (ala the marquee) but it looked too busy so I just did a slight yellow glow. For any visible screws I used steel as it would match the brushed aluminum. So this cabinet is basically steel (white), black and red. With some yellow. The black on the printed fades almost perfectly into the black paint of the cabinet. Um, just like I planned it would!
I also used 2 coin doors… Even though the Neo Geo really only needs one it looks a lot better (and symmetrical) with 2. Of course this means I need TWO coffee cans to hold the quarters, but that’s something I can live with.
The Coin / Cases of Beer Counter
Alright now for the part I’m really REALLY proud of. See, I didn’t want this thing to be on “free play” – it HAD to take quarters. But how would I convince people to put money in?
The solution came to me the first night after I’d brought the cabinet home – a money indicator! I had a Basic Stamp (easy to use programmable microprocessor) laying around that I bought years ago but never had a use for. When I was considering making a pinball table it was going to run the dot matrix LED display so I had some parts for that still. So I figured I’d use the two 8×5 LED matrixes I had to create a 5×16 display that would run off the Stamp.
Sadly the most advanced circuit I have ever built
The Basic Stamp has 16 output pins/bits that can go high and low, also sense high and low (logic levels) For this, 5 pins are used to indicate which 5 LED’s on a column light up, 4 more bits indicate which column to light (a 4 bit number gives you 0 through 15) The 4 bits go into a de-multiplexer / logic inverter circuit to drive the LED display. What you do is cycle through this quickly to give the illusion of all the LED’s being on. I know this is pretty basic stuff but it’s the first time I’ve built and programmed on from scratch so I’m proud of it.
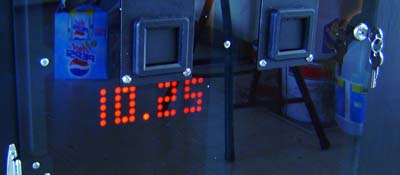
The coffee can is packing $10.25 in currency! This would actually be a really bad feature for a public machine if you think about it…
I used a cool black acrylic for the coin door. It appears black but light can shine through it. So you only see the LED’s when the machine is turned on. The Basic Stamp uses an EPPROM for program memory so the money amount can be written to the bottom of memory and be retained when the machine is off. Granted there’s a 10 million cycle limit on the EPPROM writing but if made $2.5 million off this thing I probably won’t care about wrecking a $50 Basic Stamp.
Alright so you’re probably wondering “how does this encourage people to play?” See the display shows the dollar amount, and then says “Cases… of… beer” and shows how many can be bought using the current cache of coins (in this example 0.6 as it divides the cash by 1600) The idea is if we have Neo Geo parties the coins pay for the next party’s beer. Makes sense to me! (Time will tell if it actually works) A reset button inside allows you to clear it to $00.00 when you remove the cash.
In Conclusion…
After 15 years of waiting and 1 week of building my ultimate dream project is finally a reality! The best part is I can put other JAMMA connector games in here as well and they’ll hook right up. So basically any arcade game from 1985 to 1995 should work with little problems (though none can beat the mighty Neo Geo) There’s a few things I’d like to add still, such as “Player 1 / Player 2 Beer Holders” and a vintage bottle opener, but those can be added anytime.
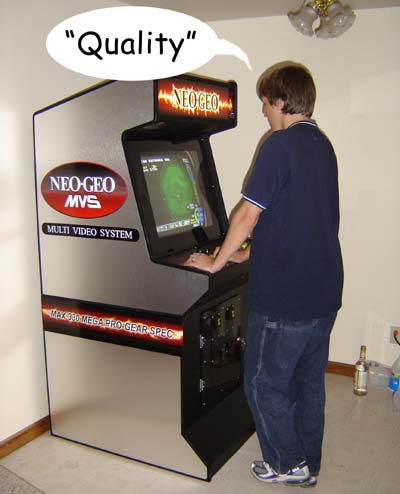
Jason Jones, who appears in the long delayed but still coming Port Washington, gives his opinion of the Neo Geo Arcade
Of course building this gives me other ideas… and Jones already wants me to build him a 4 player “Konami Machine” for his up-and-coming “Media Basement”, which would be cool for stuff like TMNT, Sunset Riders, The Simpsons and X-Men. Who knows, I might even be persuaded to build arcade cabinets beyond that for other people…
As for my next personal arcade project I’ll probably try and make my very own custom PINBALL machine once I save up some more bucks. This will of course be 100 times more difficult than the Neo cabinet was, but why make something EASIER?
2 thoughts on “Ben’s Neo Geo Arcade Cabinet”