
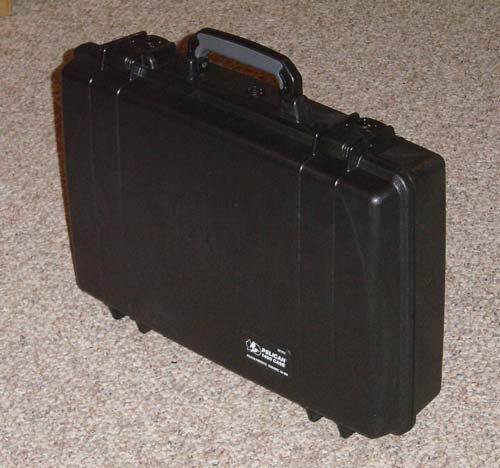
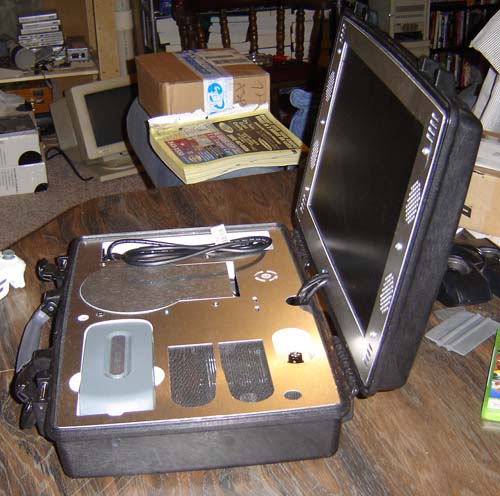
Behold – a completely normal looking Pelican case!
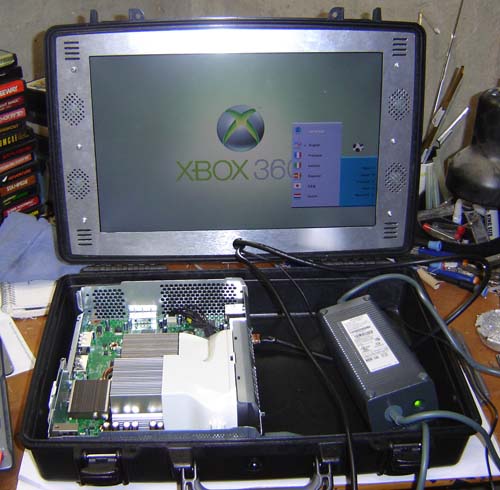
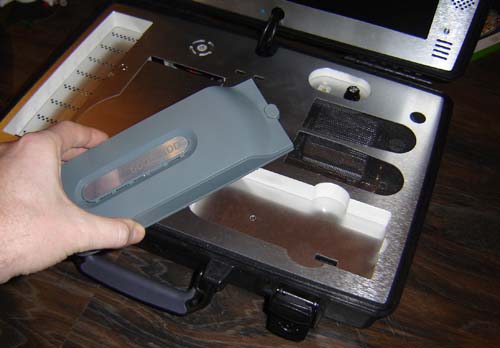
My latest project is an Xbox 360 stuffed inside of a Pelican 1490 case. The intention here to create a “tough” portable Xbox 360 that can be transported with ease.
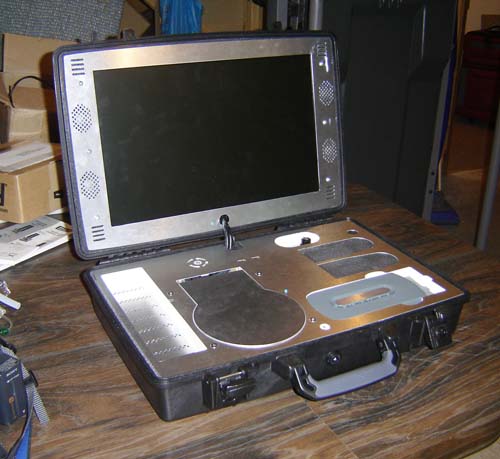
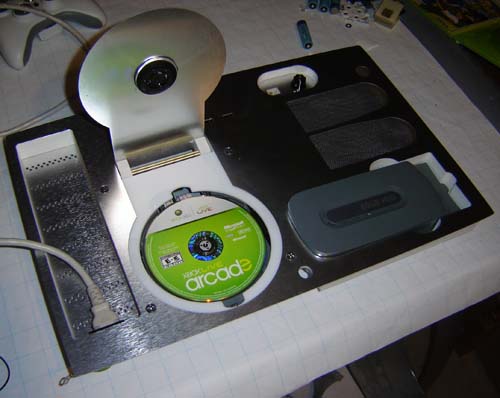
Xbox 360 inside a Pelican 1490 case
This unit includes:
- 17″ widescreen LCD monitor.
- Built-in speakers.
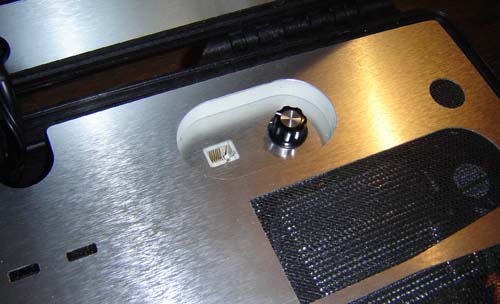
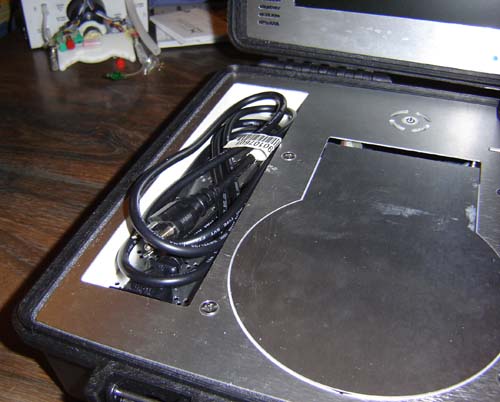
- Power cable compartment.
- Reworked top-loading DVD drive.
- Removable hard drive.
- Ethernet and USB ports.
This unit was built because I’ve had a lot of requests for game consoles that could be used overseas by our servicemen and women and I thought it’d be interesting to take a crack at the concept. It was not built on consignment, a rarity for me these days, so it is up for grabs. I’m also interested the larger-scale possibilities of this kind of project if anyone has any ideas/money.
For the fairly detailed “Making-Of” check the story after the break. You can also click here to view a video demonstrating the unit.
The idea for this unit was inspired by Clint Green’s cases that I saw last May in D.C., you can check out his site at www.greenbarron.com/armoredgaming.

Briefcase Begins
Here’s the briefcase at the beginning of the project. We tried a couple different sizes, this is the slightly smaller one. The first and most basic idea was to NOT drill holes through the surfaces of the case itself so it remains watertight/proof/whatever they claim it is.
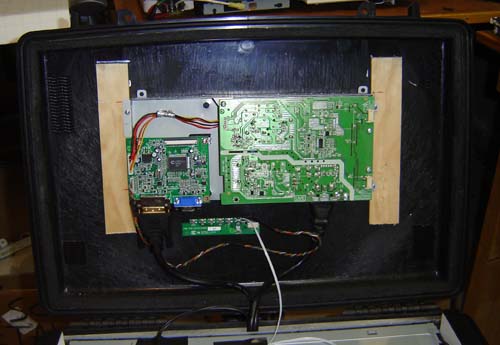
Inside the top half behind the screen. The LCD’s internals are mounted to the inside of the via a wooden frame (hey, it was the right thickness) and… wait for it… INDUSTRIAL STRENGTH VELCRO! No, really! It’s actually called “self-lock mushroom head” as it adheres to itself.
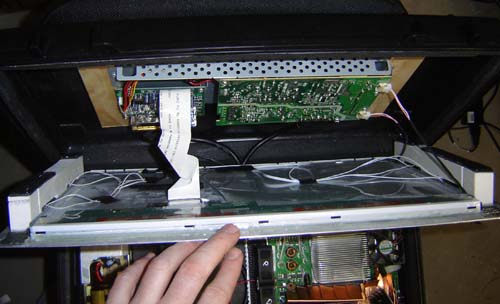
The white plastic on the sides is the mounting frame that Velcros (now a verb) to the inside of the lid. I had to figure out the inner curvature and was only about 30% off for a change!
Velcro is applied in small bits to the sanded inside surface of the case and then matching Velcro, mounted to a frame on either side of the LCD, latches onto that. So basically the LCD and metal frame Velcro into place, which sounds cheesy but this mushroom head stuff is really tough. It’s quite a chore pulling the screen back out again to make changes, but possible. I actually used less Velcro than originally planned because it was too difficult to pull out originally, and I always build things in such a way they can be taken apart. (despite what my hot-glue obsession might make you think)
With the screen portion done I tested the basic idea of fitting a 360 inside the bottom of the unit. Seems to fit. The LCD is a newer version of the kind I’ve been using in my last few Xbox 360 laptops, it’s still a Gateway but now the resolution is slightly higher.
I still like the older 1280×720’s best, been collecting those before they get too rare.
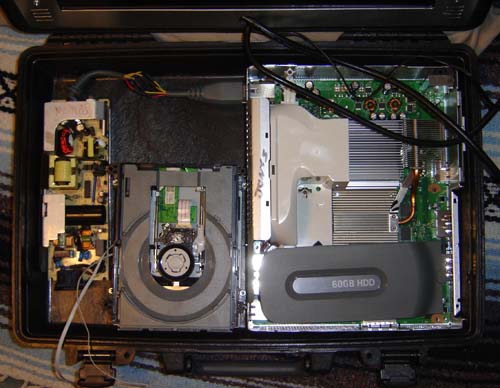
The next step was to take the XBox apart further and see how best to mount the DVD drive and power supply. This configuration looks like it will work, and have some extra “cord room” under the DVD drive itself.

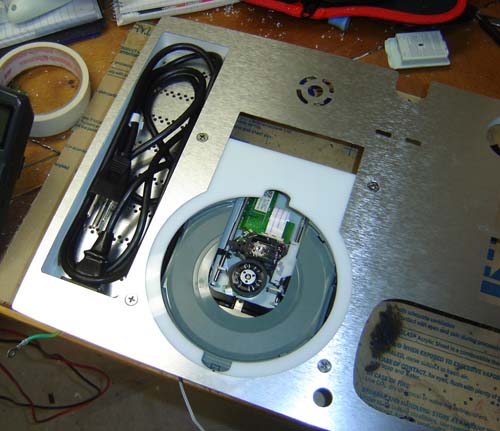
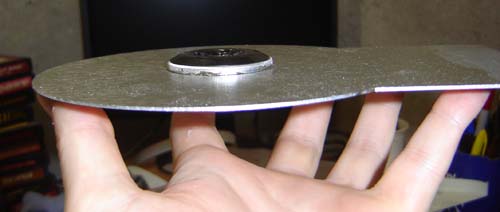
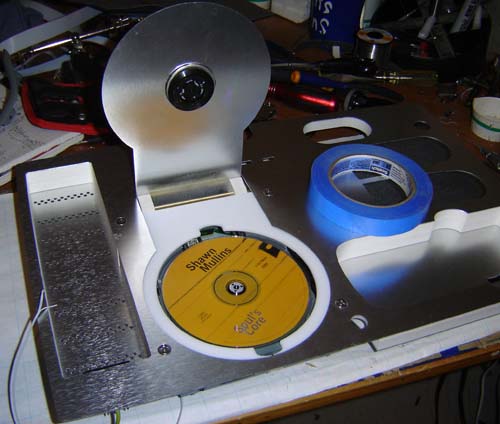
To keep all of the components inside the case the DVD drive needed to be modified. This was done by disabling the tray eject mechanism, designing a PS1-style disc lid and finally installing new limit switches to detect the position of the new door (open or closed).
My old Shawn Mullins CD is the sacrificial lamb for this first reworked DVD drive tests – my apologies to the person who bought it for me back in the day.

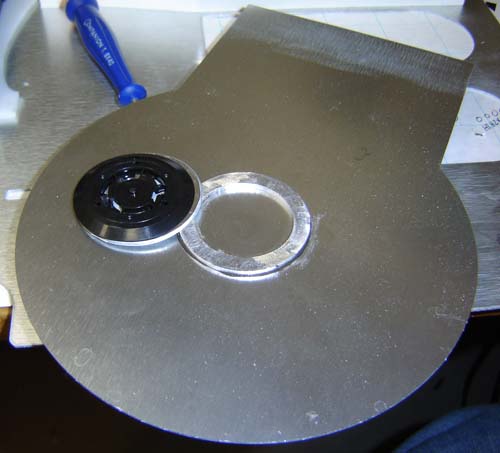
Here is the disc holding magnet, built into a new aluminum ring retainer. I had to make all this stuff quite accurate since the Xbox spins the DVD at approximately 75% the speed of light. This is actually the first time I’ve reworked a drive in such a way since the infamous MGDpc.
The DVD drive in the bottom metal frame. So far so good…
The inside of the drive lid, with the disc magnet retainer. I was pretty worried about getting this right, because the following could go wrong:
- Ring could be not perfectly (enough) centered on the drive lid.
- Drive lid could be mounted incorrectly on main surface and not latch onto center of disc.
- DVD might be spun fast enough by the Xbox to open a portal to an evil dimension and spew creatures into my crowbar-less basement.
- Depth / vertical position of retainer may be incorrect, thus damaged Shawn Mullin’s 1998 opus or worse, the laser lense.
In the end it worked out OK – there was a bit of scraping, but this was solved by putting some .020″ spacers on either side the disc on top of the white frame.
Maybe I can destroy Shawn this time…
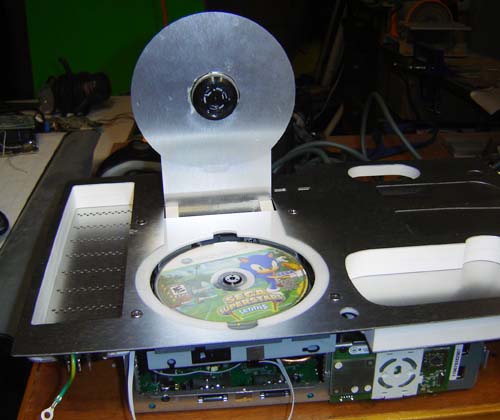
Testing the drive on the actual Xbox.
I tried to motorize the lid but I was unable to. Thus the disc must be changed with the Xbox powered off. This is unfortunate, but since I consider this unit a proof-of-concept prototype I’ll let it go for now. “Next time, baby!”, to quote Terrence Howard’s rather-ironic statement in Iron Man.

Here is the Xbox 360 motherboard used with this project. Since I’ve been working on this for a few months this is still the older Falcon board. I thought about using one of my Jaspers but the mods on the Falcon DVD had already been done and as many of you know the DVD drive is keyed to the motherboard so I can’t mix and match.
Anyway, having a bit of room to work with, I slapped a bunch of copper plating on top of the GPU, as well as some just above the heatpipe, a heat sink on that, and a 50x50x10mm fan on the GPU’s external radiator.
Two main fans blow air across the GPU and CPU in place of the stock fans. (I don’t know why I always replace the fans since they’re one of the more expensive parts to re-buy) The basic idea is to get the hot air out of the case, blow it across and then up.
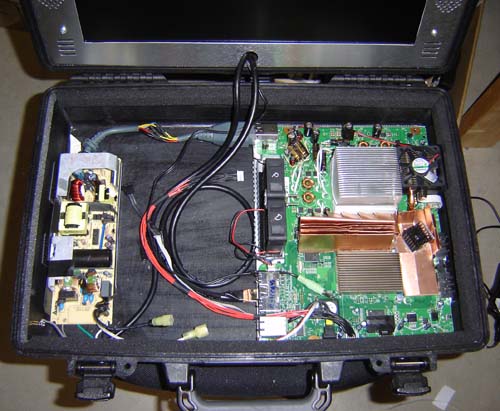
Installing the parts in the bottom half of the case. The super-Velcro was used again, in fact, I made damn sure I had all the connections done to the motherboard that I needed because I’m not sure it actually could be removed without damage. Seriously, buy some of it, it’s awesome.
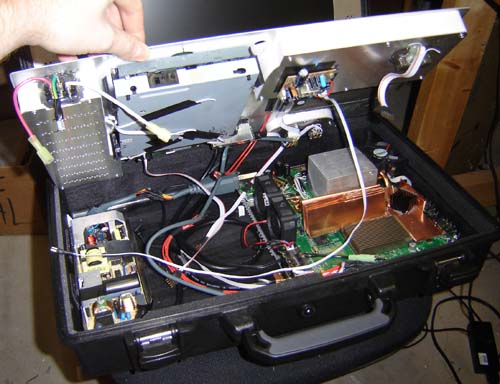
The bottom frame getting attached to the internals. Kind of looks like a mess, but the only things interconnected are SATA DVD, DVD power, AC power plug, Speaker out, HDMI out, Speaker In, Speaker Amp power, USB port, Ring of Light/Death, Ethernet and SATA hard drive. OK I guess that is a lot, but really, didn’t seem that bad to me.
To all aspiring modders – buy and use a lot of headers and receptacles. It takes longer and costs more than just wiring crap together, but when you have to pull a project apart for the zillionth time while troubleshooting you’ll thank yourself.
Thank God it all fit! I mean, I had no doubt that it would!
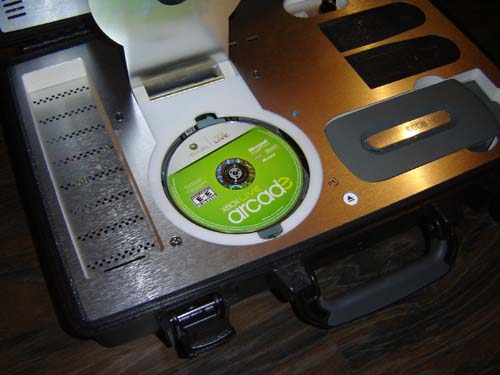
Time for a rousing game of Pac-Man.
As with the new Xbox 360 laptop the hard drive is removable, however this model does not have memory card access…
…but hey, there’s an Ethernet port finally! Don’t know why I didn’t do these before, the jack costs a whopping 2 bucks at Menards. This unit does not have a Wi-Fi module at present.
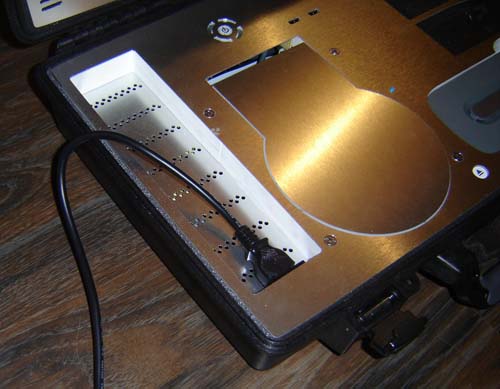
You can even take the power cord with you. I wish there would have been room to stow a controller, but it was not to be.
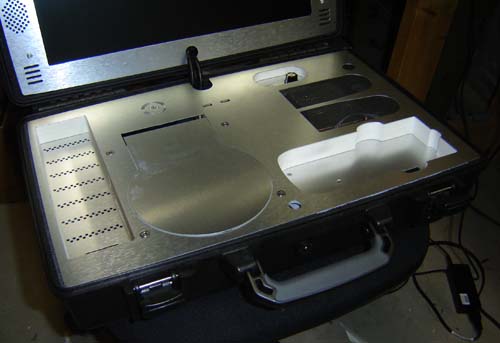
End view of the unit opened. All of the components in the lower half are flush with the surface so the unit can actually close 🙂 Note the sneaky design feature – the protruding screws around the screen match up to convenient “depressions” on the lower half of the case – specifically the cord compartment, heat sink vents (note the pointless small circular one?) and hard drive slot.
The “buy some of it” Velcro link isn’t working for me. Just does a blank page. Excellent with the disk drive. Do you find it easier to make it top loading or normal?
Is there a sync button anywhere? What happens if you have to add a controller?
Awesome mod, Ben! I’ve been admiring your mods for awhile now, and as a servicemember myself, I’ve had some experience with ruggedized cases and electronic equipment. One thing I would add as a suggestion for v2.0 would be a layer of shock foam or some kind of similar protection between the mobo and the case, just to provide some insurance against damage while in transit.
Mr. Heck
I am currently in the US Army and I would love to own this what is your asking price?
my email is
luis.zacarias@us.army.mil
thanks!
I love it
Idea:
Instead of three, fast, small, noisy fans, how about one or two 120mm fans? Have them still horizontal, but make some duct work to flow the air through the heatsinks. Much less noisy and maybe even work a little better.
I think you are referring to this page for the “mushroom head” Velcro strips.
http://www.mcmaster.com/param/asp/PSearch2.asp?reqTyp=parametric&act=psearch&FAM=hookandloop&FT_128=5119&session=hookandloop;128=5119
agree with colin, looks like it would have a few overheating issues without the duct, try running a normal 360 with the white fan shroud removed and it overheats in about 10 minutes. Also as for not using the jasper, it’s possible to flash the liteon drive now so you really could have pulled the key off the other drive and put it into this one if that’s what you wanted
I am stationed in iraq until september, i have plenty of money, how do i get one of these?
you could mod the controller to make it fit?
when are we going to see a xbox 360 car dash mod
If the case was slightly deeper (for example to allow for SgtStens’ suggestion of shock foam) could you angle the DVD drive (with a slightly modified housing) to allow it to use the normal eject mechanism but come out of the case at an angle? It wouldn’t be able to open while closed, but it can’t be ON if it’s closed anyway.
Ben I am a big fan I am only 12 years old Can you please write a guide on how to build this I am not an idiot I have made a GCp
I would love to see more in depth guide with maybe some diagrams and dimensions of the metal frames and parts placement. Im in they navy and go to remote areas alot and would love to build one of these for my crew.
Man, you should really put up a really in depth guide for this.
Many would love it =D
I wonder what one would look like if it was a PS3…
Have you planned to add a keyboard to this? or even a mouse touch pad?
Just curious…
Oh yes, while im here, im wondering, the guide on how to build a PS3 laptop, do you know if there is planned to be a part 2 and 3?
I really want to build one, like i have already built a 360 and wii laptop, both using your guides, now just need the PS3 laptop…
for anyone reading my comment and wondering where part 1 is, its here: http://www.engadget.com/2008/04/24/how-to-make-a-ps3-laptop-of-your-very-own-part-1/
Very cool,
But what if you didn’t need a monitor?
http://www.headplay.com
Mr. heck,
I would like to be in correspondence with you about building one of these. The only way my mom would let me have a game system is if I could build one. I need more direction. I would make one like you have on engadget, but I do not have the means or the know how to make the case a mount the monitor correctly. Please reply.
wabraden@bellsouth.net
or
Wguitarman1272@hotmail.com
Ben-
I am trying to do as you have with putting a 360 in a suitcase of some sort on my own. I am mainly concerned that my completed unit will not overheat… More in-depth information about this project would be of great aid to me as well as others… I am planning to use an aluminum case (like the kind the money is always in in the movies), i already have the heatsinks (large, rectangular, aluminum), three 12vDC fans, and i am planning to add WiFi, an ethernet port, USB ports, Memory card slots, a breakout board (no, i don’t plan on it being water-proof), and hopefully even a slim keyboard, and the stowable power cord (stored in compertment underneath foldable keyboard with HD drive access underneath that). I am not going to add a vision camera, as I have never had live, and see no use in it. I don’t have a 360 yet, a LCD monitor yet, or the case yet (which is funny right?). If you have any suggestions about cooling, design, or which xbox, LCD, Keyboard, etc. i should use, I would greatly appreciate it.
hey just wondering on how you made the disc drive that way, instructions would be helpful.
This is amazing, ive been looking for a portable unit for my campervan with built in screen, im going to put a link to your articles from my xbox and ps3 sites, keep up the good work
Just wondering with the ability to Dl the games to the HD and play them from there using only the disk to start the game would you be able to remove the disk from the tray after using it to start a game from the HD without powering down????
Cool case dude! I am wondering how much does the Pelican case weigh? It would be nice if it could be waterproof too. Otherwise this looks like something a must buy for the xbox 360 hardcore fans.
I noticed that this is not the first time you write about the topic. Why have you chosen it again?
p.s. Year One is already on the Internet and you can watch it for free.
I had some questions about the dvd drive and the materials used for mounting the drive lid. Is there any possible way that you could go into more depth about what exactly you did here? It looks like 1/4′ plastic stock, but I’m not sure.
Also, did you use 1/2″ plastic stock to for the HDD cutout?
I have recreated everything else except for the drive lid and it is driving me nuts. This is a great project. Thank you very much for showing the world how to accomplish this feat!
i have a question about the built in speakers you use. i was wondering which type of speakers they are because i am building something like it for my own i hope i get a response soon
That’s a pretty sweet invention, although it does look kind of heavy. It would be perfect to take along on vacations though 🙂
-Jack
I do not even want to imagine how much this costs, you should throw in some discount xbox video games with it.
I think xbox 360 is a complete collection with lots of excitements and thrill.
how much does it cost to get myself one of these? would it be better off to get my comp tech roomy to build it?? hit me back at eatsh1tfacker@hotmail.com please
I am very interested in your design and would like to discuss with you the price and possible new modifications. Thank you for your time.
Whatever the costs, I want one!!!!!!!
Dude you should try to contact microsft. they could maxproduct it.
Nice job with the DVD! I came across your site while looking up ways to mod my drive, which now takes 50 tries to recognize a disk. I want to replace the magnet with a flip top and snap in holder (like in a portable cd player) I wanted to make the suggestion of incorporating the pico projector ($350ish) into your next portable xbox prototype.
http://www.youtube.com/watch?v=7UfarRM0BoM
Bad to the bone. Love the durability case!
hey this is the bomb….i am over seas right now and would love to know how much somthing like this costs to make….any info would help thank you.
waterproof sweetness
Surely that this information site doesn’t strain on a Nokia Android. Are also consumers capturing the same issue? I like to neutral combined with don’t wish to have to be able to omit the following anytime I’m free from our pc.
I am currently deployed to Afghanistan and I saw this and thought how perfect. I am usually out in the worst places with little to no amenities and this is perfect for entertaining my Soldiers. What is the asking price for a complete unit. Thanks
Hi, I was wondering if this had a sync button for adding controllers, and how much is it for one of these?
Are you making these? You should either train a few technicians, I would love to be one, to assemble your design. There is a ton of demand. Shoot me an email if interested. I’m a quick learner and could easily do this out of my house.